


If you're like me, you always need as many project bags as possible. One is never enough. There are always more projects and I love it that way!
While I already have tutorials for our fun Reversible Sock Knitting Project Bag, Indie Project Bag, as well as our fun Brigitte Needles & Notions Zippered Pouch, I figured it was about time to whip one up for some of you beginner sewers that's a classic! A lot of my knitting readers are just getting into sewing and I thought that the Bonnie Drawstring Project Bag would make a great intro to sewing project for them that isn't boring, is fun to make but that also makes a great gift too! And more experienced sewers can play with fabric choices, add personal touches and customize to their hearts content!
You all know my personal motto is to get knitters sewing and sewers knitting! I live by that! So why not tempt the knitters to the dark side by getting them to make their own project bags that they all love? I know how much my friends and I adore our project bags and no matter how many I have I always add more. It's fun...what can I say!
When I spotted the new line "Sweet as Honey" from the uber talented Bonnie Christine a few months ago I was instantly in love. The colors, the patterns, the mixtures of designs - they were truly reflective of the style we love from Bonnie on her fab blog "Going Home to Roost"! I loved that she stayed true to her addicting aesthetic! The fabrics are as lovely as all of her work. And to top it off her line is available from Art Gallery Fabrics - one of my fave fabric lines. Their pima cotton is to die for soft and drapes beautifully!
When Bonnie asked me to join in on her Sweet as Honey Blog Tour I was thrilled! The only problem I had was deciding which fat quarters to use!!! I had already gotten my hands on some of the fat quarters so I luckily was able to mix and match for my project today! I highly recommend the prints in this line. They are so cheerful and beautiful and I find myself so drawn to them during the rainy season we are just putting behind us here.


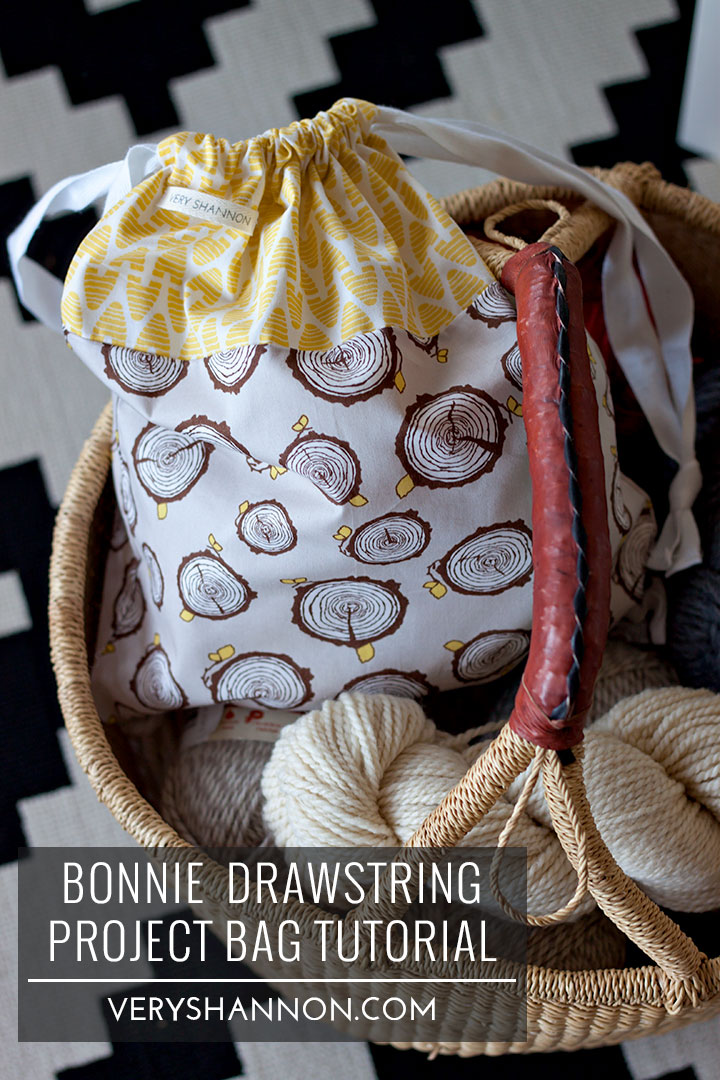
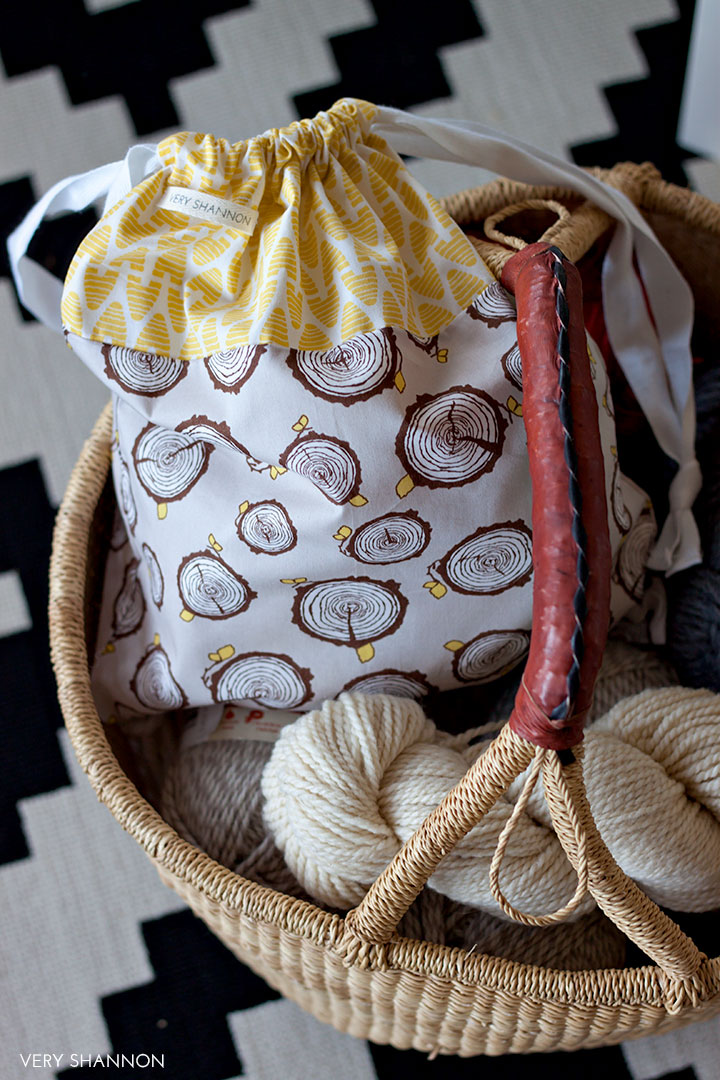
BONNIE DRAWSTRING PROJECT BAG TUTORIAL
*Copyright 2014 VeryShannon.com. All rights reserved. Email askveryshannon@gmail.com if you have questions.
MATERIALS
*NOTE: I made my project bag using 2 fat quarters that measured 19 x 22". The main portion of the bag is a 12.5"W fat quarter folded in half height wise. I have given instructions/dimensions for the fat quarter pieces below but will also list below the dimensions if you would like to use a different piece of fabric.
1 Fat quarter of main fabric cut to 12.5"W (19"H)
1 Fat quarter of accent fabric cut to 2 pieces 12.5"W x 6"H
OR
1 piece at 12.5"W x 19"H of main fabric (or 2 pieces at 9.75"H sewn together with a 1/4 SA with edges finished)
2 pieces at 12.5"W x 6"H of accent fabric
2 pieces of 1/2" twill tape at 32" - 35"L (or drawstring material of your choice..ex ribbon, fabric)
Removable fabric marker
Coordinating thread
Scissors or rotary cutter w/mat

INSTRUCTIONS
*ALL SEAM ALLOWANCES ARE 1/4" UNLESS OTHERWISE NOTED.
STEP ONE: PIECING TOGETHER YOUR BAG

*NOTE: I made my project bag using 2 fat quarters. I will give instructions/dimensions for the fat quarter pieces but will also list below the dimensions if you would like to use a different piece of fabric.
TIP: If you have sewn two pieces of fabric together to form your main fabric for the bag you may skip the step above.
Take your main fabric piece that is 12.5"W x 19"H and fold in half with right sides facing each other and press along fold. The fold will be the bottom of your bag.
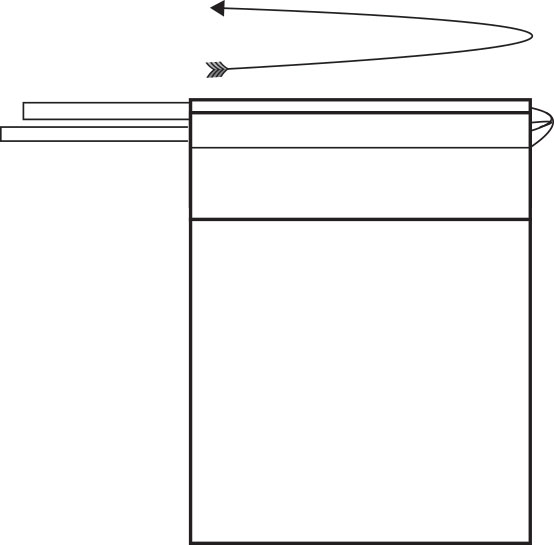
With your main and accent fabric right sides together sew your accent fabric to both the top and bottom of your main fabric using either a serger or on your sewing machine. If using your sewing machine finish your seam allowance with a zig zag stitch or other appropriate stitch. Press your seam allowance towards your main fabric. *See diagram to the left.
STEP TWO: FINISH SEAMS
Using a serger (or a sewing machine) finish the side seams of the whole bag neatly right along the edge.
Measure and mark 3" down from the top of your bag. This will be where our opening for our drawstring will be. *See diagram below.

STEP THREE: SEWING YOUR BAG
With right sides facing each other sew both side seams with a 1/4" seam allowance (if serging sew right along your inner serged edge) starting from the mark you just made. *See diagram below.

STEP FOUR: CREATING YOUR CHANNEL
We are now going to make the channel for your drawstring. You are almost there! Press your seam allowance open and towards the wrong side of your fabric carefully. Now fold down and press the top of your fabric down 1/2". Then press and fold again 1". Make sure your seam allowance is fully enclosed in your fold. We don't want this show from the outside of the bag. Pin along the entire top perimeter of your bag. Topstitch along this fold close to the inner edge of your fold neatly and precisely. Press well. *See diagram below.

STEP FIVE: PUTTING IN YOUR DRAWSTRING
Attach your safety pin to one end of your twill tape and pull the twill tape through the opening on your front left side and out through the front right side. Then pull it back into the right side of the other side of the bag (the back) and back out the left side forming a loop. Tie a half knot with both ends together. Repeat this step but this time entering in the channel from the front left side. *See diagram above and below.
I like to finish the ends of my drawstring off by serging and then pressing over 1/4" or so and stitching it down. This is optional though. Feel free to use or make whatever you'd love to have as your drawstring.

You did it! Yay! Great job! This is a great time to add your label or any finishing touches you may want! Personalize and customize to your heart's content! That's what makes these bags fun!!!!
Make sure you share your pics! Add them to our flickr group, share them on our facebook page, or comment with a link below! I love seeing your project pics!
You also do not want to miss all the stops on the Sweet as Honey Blog Tour! Thanks again for having me Bonnie! There have been some amazing projects!!!! Tomorrow the tour will be stopping to visit Heidi at Hands Occupied and yesterday a lovely table runner was made by Mel at Missouri Mel.
P.s. - if you love the basket in the shots above as much as I love mine it's from Tolt Yarn and Wool. I adore it! Plus you can wet it and reshape it!
