guest

SUMMER SWEATER KNIT ALONG || COLORWORK DEMYSTIFIED WITH SPECIAL GUEST TANIS FIBER ARTS!

COLORWORK DEMYSTIFIED WITH TANIS FIBER ARTS | VERYSHANNON.COM #SSKAL14 #KNITTING

It's time for another fabulous guest post for our Summer Sweater Knit Along! I'm beyond excited to have the insanely talented Tanis Lavallee of Tanis Fiber Arts here on the blog talking all about colorwork!!! 

This subject comes up so much in our ravelry group and especially during our garment knit alongs. Colorwork can at first seem very intimidating but Tanis does an amazing job below demystifying it for us all. It's one of those things that at first can be scary and seem like a lot to learn but in all honesty, once you get going, it's fun and produces a high impact! I hope after reading Tanis's post you'll give it a try if you haven't already.

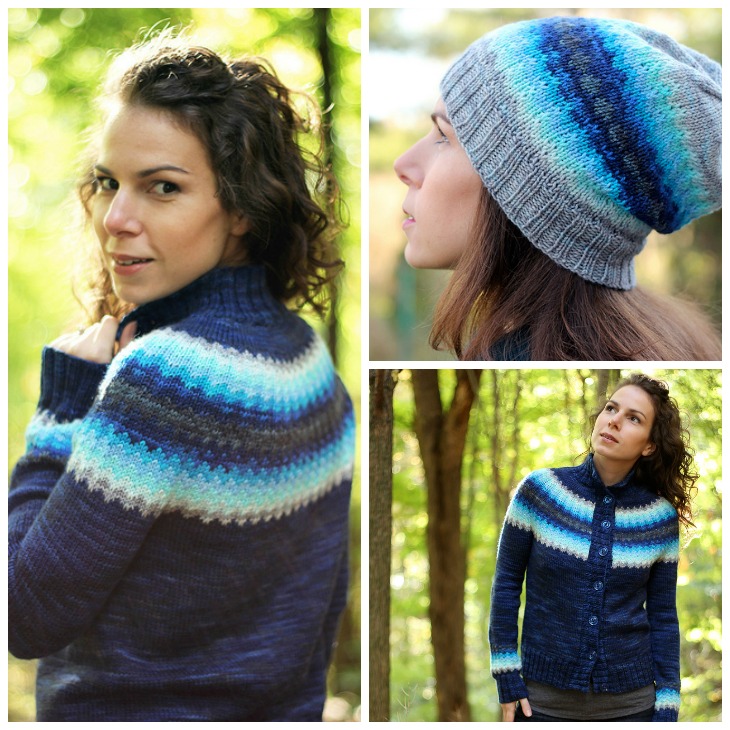
Coolbreeze Cardigan & Hat by Tanis Lavallee
Tanis is a fabulous designer as well as the owner of one of my favorite yarn lines - Tanis Fiber Arts. Color, depth & squish factor all add up to make some seriously drool worthy yarns! She's also got a beautiful blog where she shares her designs, style posts, knit alongs and more. Tanis is a long time friend and am I'm so thrilled to have her back again for the SSKAL. She's so inspiring and one of the nicest people I know. You can see her previous post on "knitting with hand dyed yarns" here.

And now here's Tanis...


Ah colour, the more the better, am I right!? Obviously I love me some wonderful, colourful yarn and I find myself constantly drawn to projects that use multiples colours together. I just love all the options and seeing what an impact different colour pairings have on a pattern. So, with that in mind, I'm going to chat a bit about colourwork today. Don't be scared! I know lots of people get nervous thinking about working with more than one strand of yarn at a time, but I'm here to tell you that it's really nothing to be afraid of. One way to lighten the mental burden is to realize that most colourwork patterns are simple stockinette stitch. If you can knit cables, or lace, can turn the heel of a sock or can follow a chart then you can handle a colourwork project for sure.

So, first step: choosing colours. This is a topic that you are bound to over think but in my opinion there are really no rules. If you really want your motif to pop then be sure to select high contrast colours. Standing out dramatically isn't always the goal and sometimes a more subtle shift can be really beautiful too. One really good tip to judge the amount of contrast between your yarns is to snap a photo of the intended yarns and convert it to black and white. Looking at them as values will help to highlight the difference. In the example shown below we've got my Snowfling Mitt knit up with the high contrast pairing of Natural and Garnet. Once converted to black and white the pattern still really pops - we know we've got a good amount of contrast here.

COLORWORK DEMYSTIFIED WITH TANIS FIBER ARTS | VERYSHANNON.COM #SSKAL14 #KNITTING

Remember how I said that there are no rules when it comes to choosing colours? Below is a photo of one of my very favourite colourwork projects, an R&R Hoodie I knit for my son Rowan. When converted to black and white there is very little contrast between the three main colours of the sweater (in the b&w version you can't even tell that there is colourwork on the bottom!) but I love this sweater especially because of the subtle shift in tones. So don't let yourself get too caught up in the high contrast black and white trick - sometimes subtly nuanced knits are just the ticket!

COLORWORK DEMYSTIFIED WITH TANIS FIBER ARTS | VERYSHANNON.COM #SSKAL14 #KNITTING

The most daunting part of knitting with two colours at once is managing two strands of yarn. Some people will hold one strand in each hand and knit both english style and continental at the same time. I'm sure it takes a lot of practice but is probably pretty great once you get the hang of it. I. however, don't use that approach, I knit english style and simply drop colour A, pick up colour B, knit the stitches that I need to with colour B and then drop it to continue with colour A again. Both yarns are on my right side, I'll put one ball in back by my hip and the second ball more to the front by my knee and if the strands start to get twisted it's very easy to spot and untwist. Twisting and tangling yarns isn't a problem if you are consistent with where you pull your yarn from. If you always carry colour A under colour B, you won't have any problems. Bonus tip! The colourway that you carry underneath will be the dominant colourway in your pattern. So if you have one shade that you really want to pop and the other that is more of a background colour, be sure to carry the star colour underneath!

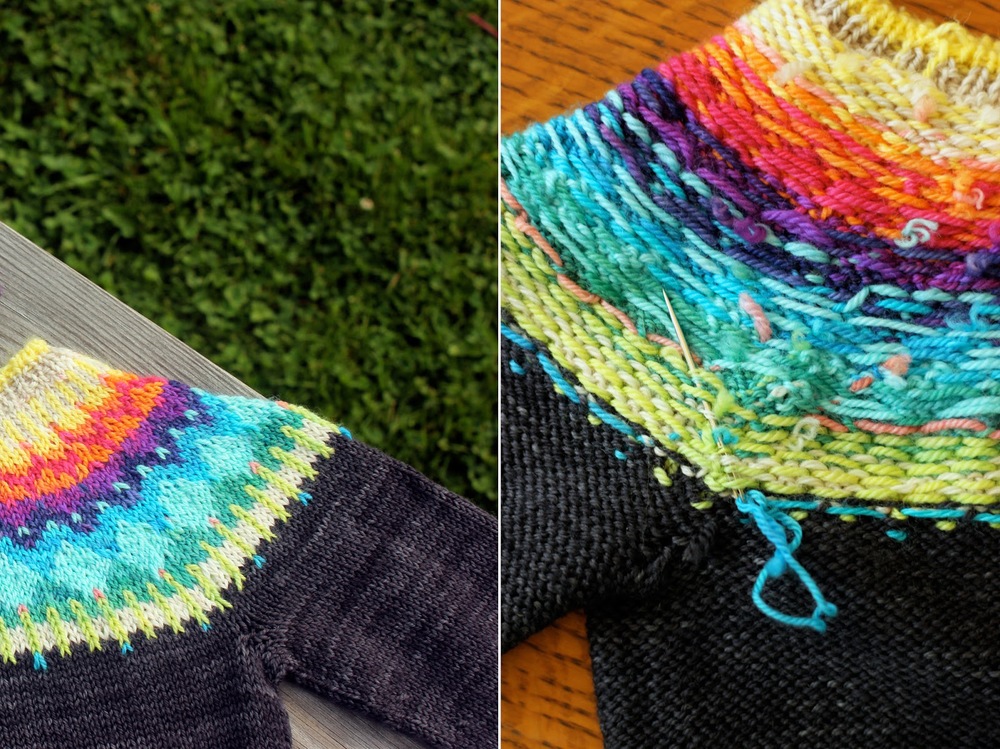
When working any colourwork pattern, it's really all about the chart. Charts can look super intimidating, but the trick is to take it all one row at a time. Take the sweater pictured below for example. It looks rather complicated right? Five colourways, lots of intricate patterning, surely it must have been very difficult... Nope!

COLORWORK DEMYSTIFIED WITH TANIS FIBER ARTS | VERYSHANNON.COM #SSKAL14 #KNITTING

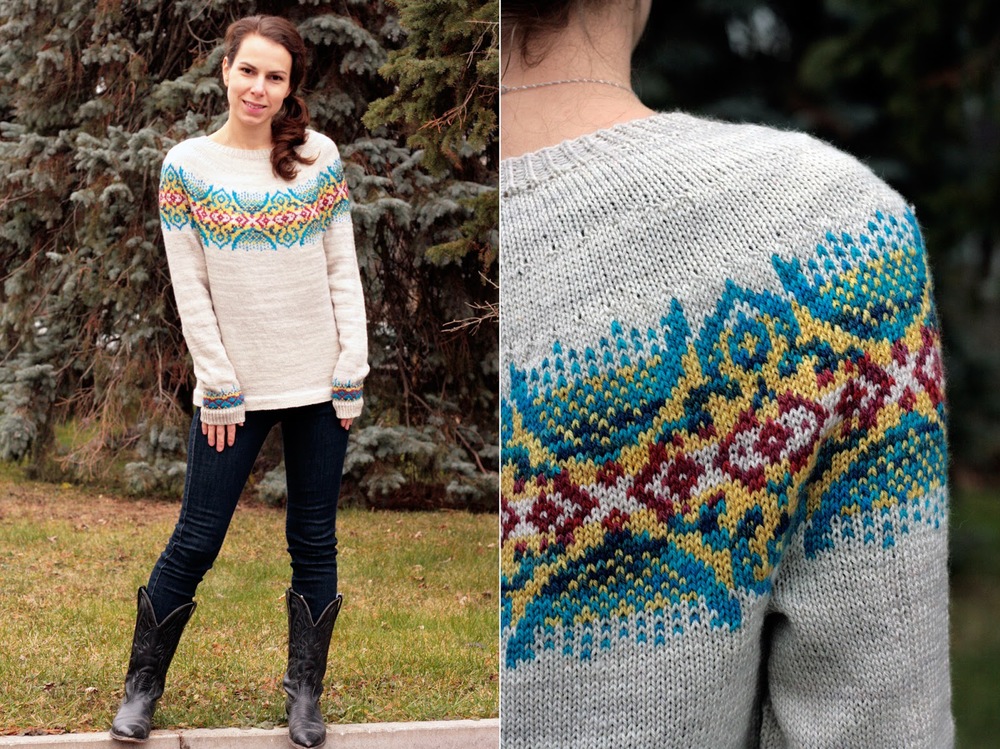
And here are the reasons why: there are two rules that I follow when designing colourwork charts. The first is the rule of sevens. If at all possible, I try never to go more than seven stitches without switching colours. Any bigger gaps make for very long floats, which can make achieving an even tension difficult. I'll sometimes stretch it to nine stitches, but seven is my benchmark. The second rule is to never use more than two colours per row. As soon as you start working with more than two strands at a time the amount of effort required to keep all your balls straight increases dramatically. You can achieve amazing multicoloured, multidimensional results without going to any trouble at all by sticking to this rule.

Lets talk about gauge. Gauge is a knitters best friend right? We talk about it for every single project! When it comes to colourwork projects, you might find that your gauge differs between your colourwork portions and your single colour portions. So in the case of a colourful yoked sweater like the Byzantine Pullover shown above, you might find yourself having to change needle sizes to achieve a consistent gauge throughout your sweater. We tend to get too focused and knit stressfully tight when working colourwork. Relax and keep it loose! If your floats are too tight your work will pucker and won't lay flat. 

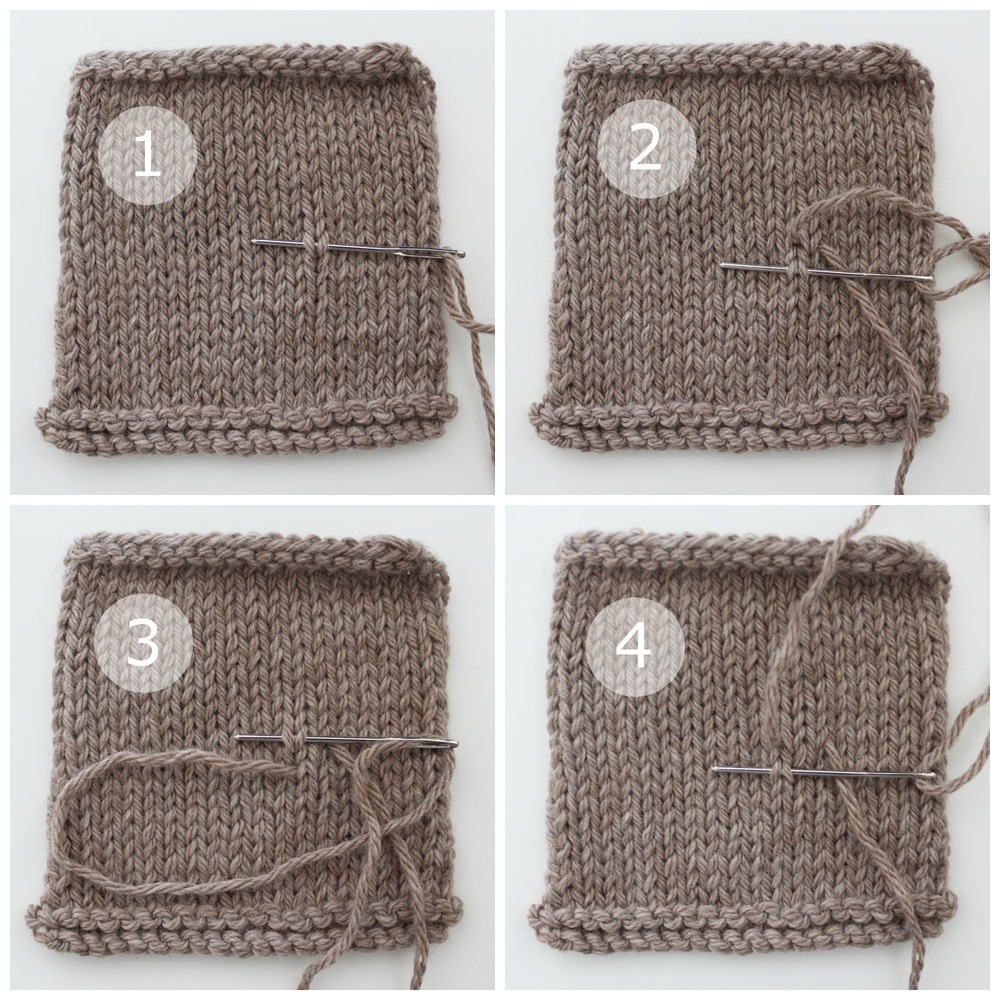
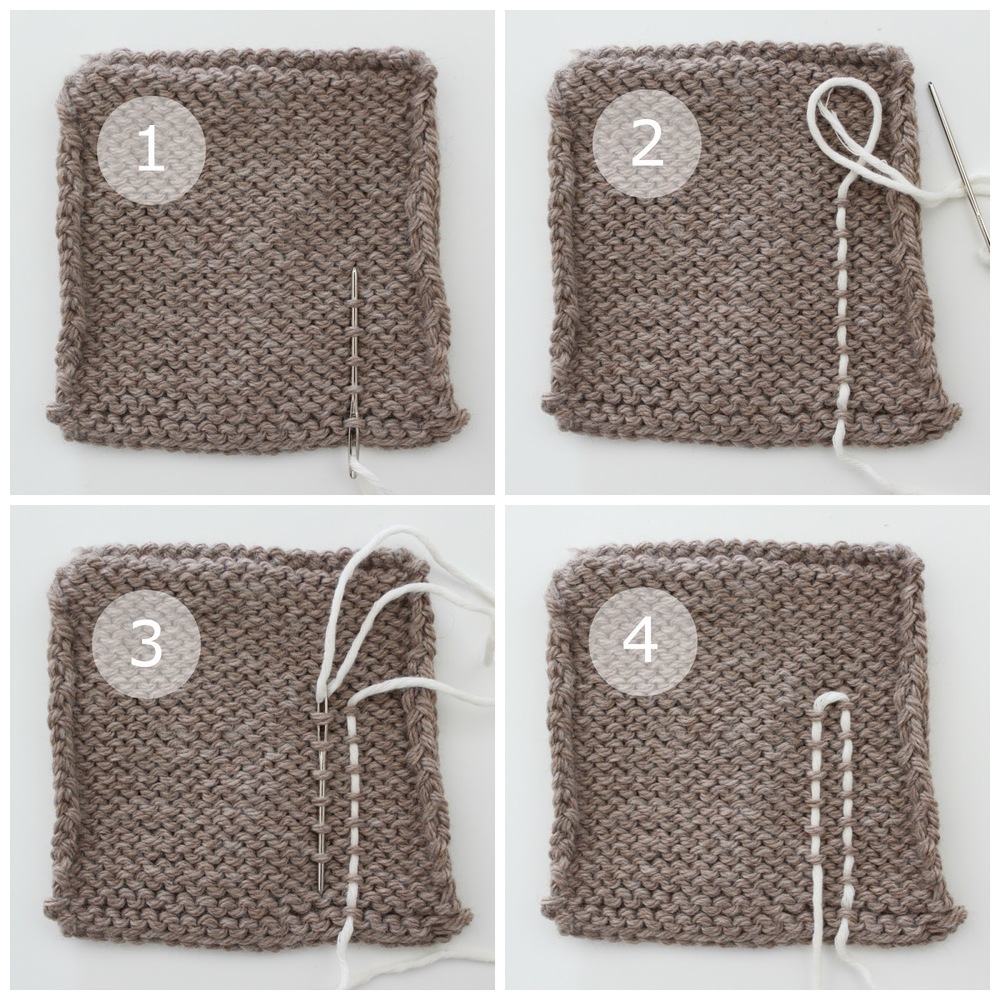
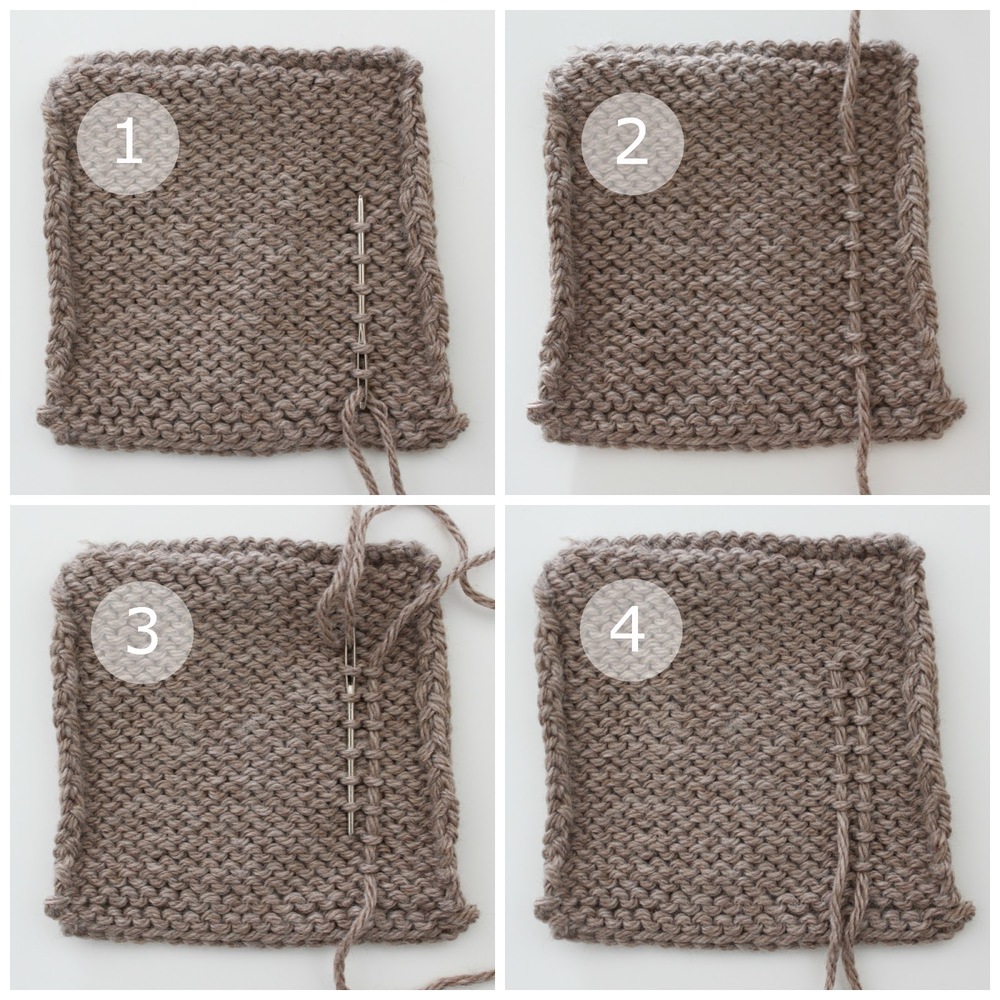
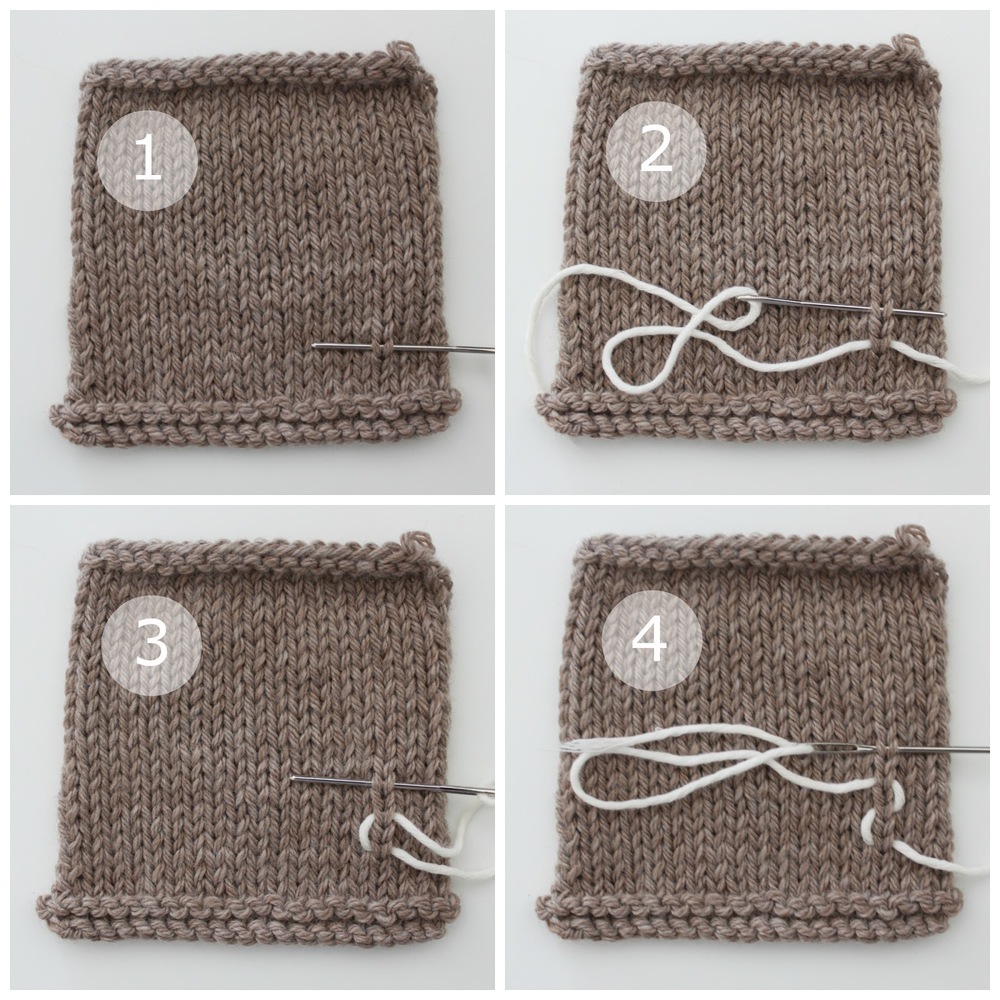
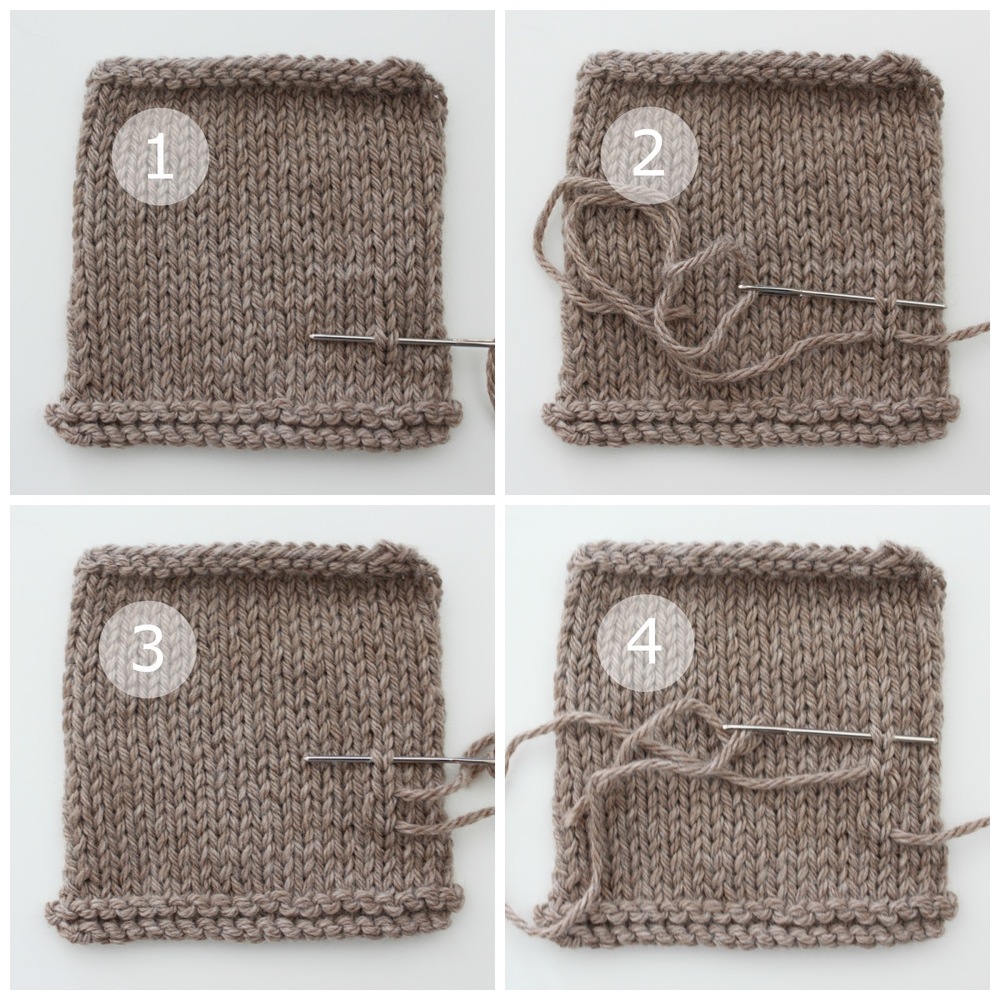
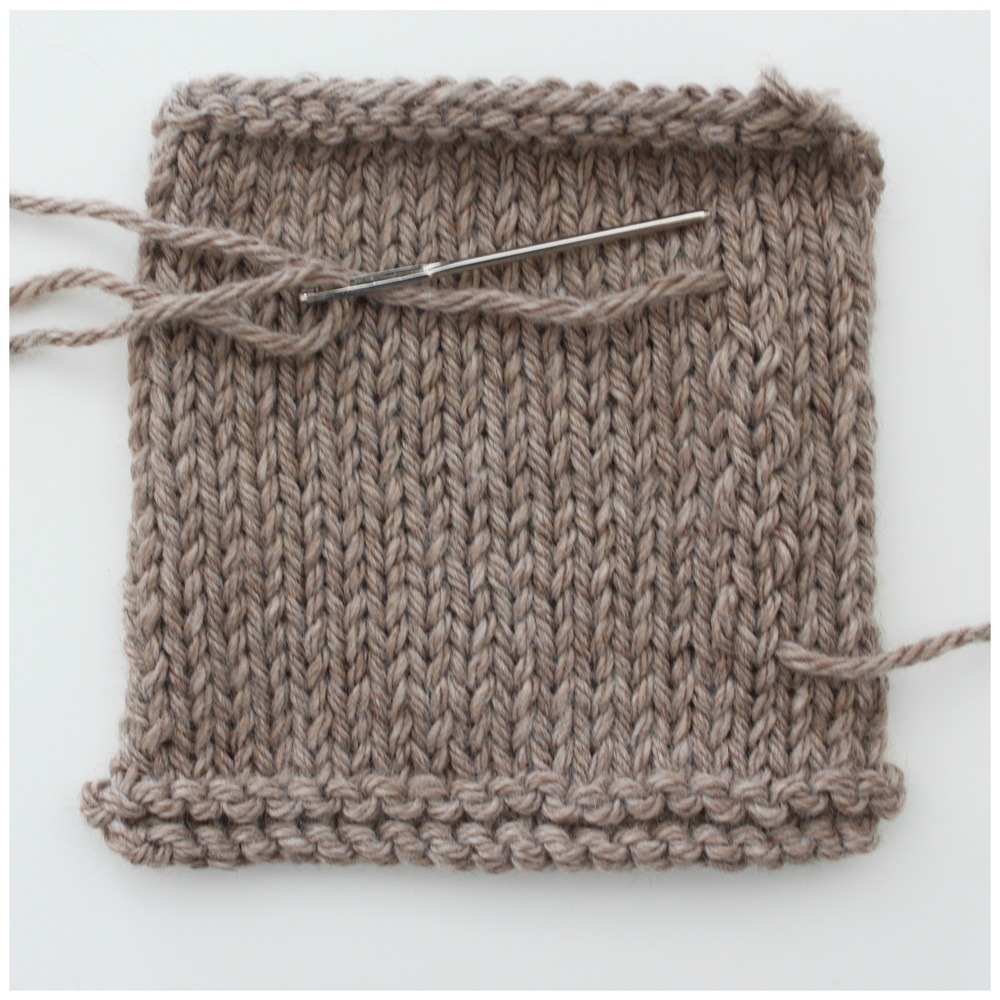
So, now you've made your chart, have knit your lovely garment and are ready to sew in the ends. All those ends! There are lots of ways to sew in ends, Jane highlighted a few in her lovely blog post earlier this month, but I've recently discovered a new-to-me way of weaving in ends that I absolutely love. I now use it for all of my projects, but find that it works especially well with colourwork. You know how the backside of colourwork is a thing of beauty in and of it's own right? Well, lovely as it may be I've always found it difficult to figure out where exactly to weave in the ends. Since you don't have the perfect backside of your stitches staring at you, but rather lots of floats blurring up your vision, where do you anchor in all those ends? The solution is to use a sharp darning needle and rather than weaving in and out of entire stitches, go directly through the plies of your yarn. The backside of your knitting will look a little less polished, but the side that really matters will look perfect! This trick really helps all  those ends to kind of felt together and stay put, resulting in no ends poking through to the front. Yes!

COLORWORK DEMYSTIFIED WITH TANIS FIBER ARTS | VERYSHANNON.COM #SSKAL14 #KNITTING

Last but not least, lets chat blocking! When it comes to blocking my hand knits, I almost always choose to wet block. I can't remember the last time I considered a knit finished without a good soak-and-lay-flat-to-dry time. Your colourwork knits are no exception, they benefit greatly from a good wet block. You should block them just as you would any other knitting project (you'll marvel at how beautiful your stitches look and how clear your motif is after blocking. The colourwork pattern really emerges!) the only tip I have for this step is to be sure to soak your colourful knits in COLD water! Heaven forbid any of that gorgeous colour should run, cold water will go a long way to  help keep the colour where it should be.

So, there you have it. Colourwork demystified (I hope!) Like anything else in knitting the best way to learn is to just dive in. Don't be afraid of all the glorious action going on in a colourful garment, it's really a lot more straight forward than it looks and I know you can do it!


Thank you so much for the awesome post Tanis! I can't wait to try some colorwork this fall! I've been dying to try some all year. Thank you for making amazing yarn and patterns and for inspiring us all.  You can find all things Tanis Fiber Arts here:
www.tanisfiberarts.com

Do you love colorwork? Have you always wanted to learn? Are you a fan of Tanis Fiber Arts? Come chat!  I'd love to hear & see if you made a colorwork project for the Summer Sweater Knit Along! 

THIS POST IS PROUDLY SPONSORED BY

WWW.BROOKLYNTWEED.COM

SUMMER SWEATER KNIT ALONG || WEAVING IN ENDS WITH GUEST JANE RICHMOND

Weaving in ends with guest Jane Richmond || VeryShannon.com #sskal14 #knitting
I'm so excited to have my bestie and business partner - Jane Richmond here as our guest today!

Our Summer Sweater Knit Along would not be complete without a guest post from Jane! I think she's been in all of them so far! I love her to bits and could gush about her fabulousness all day but I'll spare you for now...lol. You all know how much of a fan I am of her work and her technique posts are some of our most popular for our knit alongs! 

Today Jane's here to chat with you all about weaving in those ends! I know a ton of us hate this task but trust me - it's worth every minute. When spending all that time to knit your gorgeous new garment it's so important to take the extra steps for a beautiful finish and a lovely inside for your garment as well as the outside. You guys ready to get weaving in those ends?
1. Grace 2. Inland 3. Beacon Hill
Let's hear from Jane...


Thanks for having me back on the blog Shan! Your SSKALs are always so much fun, I'm excited to be a part of it even if I can't participate with a knitting project!

For my post I would like to share with you my two favorite methods of weaving in ends. Each serves it's own purpose depending on who I am knitting for. The first is an invisible method perfect for gift knitting or projects that I know don't need to be altered after finishing. The second is the method I use most and leaves ends secure but visible and easy to pull out in case adjustments need to be made!

Both methods are illustrated first using a contrasting yarn so that each step is easier to see, and then followed by images using matching yarn to demonstrate how invisible/visible each method is. You'll find instruction for weaving in ends on both the knit and purl sides of Stockinette fabric.

PURL SIDE /// contrasting yarn
In the demonstration below I've used a contrasting yarn to make the steps more visible.
Weaving in ends with guest Jane Richmond || VeryShannon.com #sskal14 #knitting

Weaving in ends with guest Jane Richmond || VeryShannon.com #sskal14 #knitting
PURL SIDE /// matching yarn
Below I've demonstrated the same method using the same yarn as the swatch to demonstrate how invisible the results are.
Weaving in ends with guest Jane Richmond || VeryShannon.com #sskal14 #knitting
KNIT SIDE /// contrasting yarn
The first picture tutorial was demonstrating how to use this method on the purl side of a Stockinette fabric. Below is the same method only on the knit side of the fabric. This is also the same method used to create a duplicate stitch on a knit fabric to embellish a finished project.
Weaving in ends with guest Jane Richmond || VeryShannon.com #sskal14 #knitting
KNIT SIDE /// matching yarn
This is what it looks like using the same yarn as the swatch. The duplicate stitches blend right in.

Weaving in ends with guest Jane Richmond || VeryShannon.com #sskal14 #knitting
PURL SIDE /// contrasting yarn
Weaving in ends with guest Jane Richmond || VeryShannon.com #sskal14 #knitting
PURL SIDE /// matching yarn
Weaving in ends with guest Jane Richmond || VeryShannon.com #sskal14 #knitting
KNIT SIDE /// contrasting yarn
I weave in the ends on the knit side a little differently. As you can see they are still very visible and this method is very easy to pull out.
Weaving in ends with guest Jane Richmond || VeryShannon.com #sskal14 #knitting
KNIT SIDE /// matching yarn
Weaving in ends with guest Jane Richmond || VeryShannon.com #sskal14 #knitting
Happy Knitting!!!

Thanks for joining in today Jane! Love this tutorial! So handy! I hope you all enjoy it and find it helpful when finishing your new sweaters! You can always find all of our guest tutorials on our Tips & Techniques page HERE and all of our Summer Sweater Knit Along posts HERE.

You can find more Jane Richmond below:


THIS POST IS PROUDLY SPONSORED BY

WWW.brooklyntweed.com


SUMMER SWEATER KNIT ALONG || PROVISIONAL BIND OFF TUTORIAL WITH GUEST BRISTOL IVY

Provisional Bind Off Tutorial with Guest Bristol Ivy || VeryShannon.com #sskal14

We've got another fabulous guest tutorial today for the Summer Sweater Knit Along 2014 from one of my fave designers - the lovely Bristol Ivy!

Bristol's designs speak to my texture loving soul. I love her unique constructions, creative lines and overall aesthetic of her work as a designer. She's a huge source of inspiration for me as a designer and I've been a fan of hers since she started so I'm just over the moon to have Bristol here for our Summer Sweater Knit Along 2014! I knew you would all be just as excited as I am!

Bristol has a written a tutorial for us that is for one of those garment knitting situations that you're always wondering if there was a better way to handle. You know that happy place in a top down sweater that you reach when you get to separate for sleeves? Yep, that wonderful knitting haven where you think "it looks like a sweater" and "now I can try it on" time. You know those stitches you have to put on waste yarn - well Bristol is showing us how to do the Provisional Bind Off in place of just putting those lovely stitches on a scrap yarn to get all distorted. Genius. No distorted stitches and it's much easier to try your garment on. I seriously live for these kinds of things. I'm always researching and trying to learn as a knitter and learning something new like this is food for the soul for me. I encourage you to give it a try! Don't be scared of the word "provisional". It's got a bad rap in the knitting world as being hard and it's really not. Promise.

Provisional Bind Off Tutorial with Guest Bristol Ivy || VeryShannon.com #sskal14
Before we jump in the lovely Bristol's birthday is this week! Happy birthday Bristol! In honor of her bday she has a lovely Birthday Sale! Bundle on! Use coupon code "29on28" to get 29% off the patterns listed in the bundle until August 31st.


And now here's Bristol...

Provisional Bind Off Tutorial with Guest Bristol Ivy || VeryShannon.com #sskal14

Knitting a top-down sweater can be a fabulous way to get acquainted with sweater knitting.

Seamless, easy to try on and refine the fit of as you go, and a great way to eke out every last inch of your favorite yarn.  What’s not to like? But I’ll admit there was one part of the process that I didn’t love--putting the sleeves on waste yarn after the yoke was complete.  Either my waste yarn was too short and I couldn’t get my arms through, or it was too long and my stitches got distorted.  And what was going on with the stitches at the beginning and ends of each sleeve? It’s like they completely disappear, any extra slack in them getting absorbed into the body stitches on either side.  And, to be completely honest, a huge stumbling block? Hunting down a tapestry needle so I could thread the yarn through in the first place.

The biggest thing that bugged me about this, though, was how badly my sleeve stitches got distorted while they were on their holder.  I never felt like I got an accurate idea of how my sleeves fit, and finessing them back to the original gauge was always such a headache.  With these annoyances in mind, I started brainstorming other ways you could hold the sleeve stitches--something that would still be easy, prevent distortion, protect the integrity of the stitches at each edge, and wouldn’t need a tapestry needle.  Here’s what I came up with: the Provisional Bind-Off!

Just like the Provisional Cast-On Tutorial that Hilary showed you a couple weeks ago, the Provisional Bind-Off holds your stitches ready to work for whenever you need them.  Here, I’m demonstrating on half of a basic top-down raglan shape, worked in Brooklyn Tweed Shelter in Nest (special thanks to my friend Aimee for being a willing hand model!), but this is relevant to any place where you might hold stitches: underarms, henley plackets, back necks, et cetera.

Provisional Bind Off Tutorial with Guest Bristol Ivy || VeryShannon.com #sskal14

STEP ONE \\ With your working yarn, work in pattern as established to the stitches that need to be held.

Provisional Bind Off Tutorial with Guest Bristol Ivy || VeryShannon.com #sskal14

STEP TWO \\ Drop your working yarn and pick up your waste yarn (either a spare ball or a length approximately 4 times as long as the fabric being held). (Image 1)

STEP THREE \\ With waste yarn, bind off knitwise all stitches to be held. (Images 2, 3 & 4)

Provisional Bind Off Tutorial with Guest Bristol Ivy || VeryShannon.com #sskal14

STEP FOUR \\ After knitting the final stitch, elongate it by pulling more yarn through, then break the waste yarn (you can leave this stitch live as Hilary’s done at the end of her Provisional Cast-On, but I tend to get it caught on things.  Try it and see!). (Image 1)

STEP FIVE \\ When you reach the end of the stitches that need to be held, fold the bound off fabric onto itself to close the gap between the stitches previously worked in your working yarn and the next stitches, and continue on with the next set of pattern instructions in the working yarn, whether that’s casting on stitches to cover the gap, or just continuing directly to the next set of stitches.  In my example, I am working directly with the next set of stitches. (Images 2 & 3)

The Provisional Bind-Off is complete! 

Here you can see the body of my sweater sample is started and the sleeve stitches are held with the Provisional Bind-Off, ready to be unzipped and worked. (Image 4)

Provisional Bind Off Tutorial with Guest Bristol Ivy || VeryShannon.com #sskal14

STEP SIX \\ When you’re ready to work the held stitches, slide the tail of the waste yarn back through the previous stitch and through the first live working stitch (shown from the wrong side).

Provisional Bind Off Tutorial with Guest Bristol Ivy || VeryShannon.com #sskal14

STEP SEVEN \\ Unzip the bind-off stitch by stitch, replacing the stitches on the needle.  You can then proceed with the pattern instructions as written as show above and below.

Provisional Bind Off Tutorial with Guest Bristol Ivy || VeryShannon.com #sskal14Provisional Bind Off Tutorial with Guest Bristol Ivy || VeryShannon.com #sskal14

A couple tips: make sure to use relatively smooth, non-toothy waste yarn.  

For the example shown, to pair with the Brooklyn Tweed Shelter I used Quince & Co.’s Lark, a smooth, worsted-spun 100% wool that I knew wouldn’t grab onto the stitches it held and make it difficult to unravel.  Fibers or yarn types to avoid would be mohair, alpaca, cashmere, boucle, novelty yarn, or anything with a halo that could get tangled in the stitches of the working yarn and make it hard to unravel.

Additionally, be mindful of your bind-off.  

If you know you typically go up or down a needle size when binding off to match your working gauge, do so here as well.

Once you’ve taken these steps to provisionally bind off your stitches to be held, you can try the sweater on and proceed as usual, without worrying about any of your stitches distorting the structure of the bind off.  This will hold your stitches in place and match your working gauge, giving you a much better idea of how the sleeves will fit.  It will also make it easier to recover and work those stitches when you’re ready.  Plus, as a huge bonus, no hunting down that elusive tapestry needle!

So there you have it: the Provisional Bind-Off.  Give it a try next time you have to hold some stitches!


Thanks so much for being on the blog today Bristol! You can find all things Bristol below...


What do you think? Have you tried this method before? Do you adore the Provisional Cast on and Bind off too? 

THIS POST IS PROUDLY SPONSORED BY

WWW.BROOKLYNTWEED.COM