weekend wishes

to have the time to make this rockin' granny square blanket...


to swing inside...

image from ma poupette via pinterest
that the rain will stop...

image by voilet d'art
to go see "chimpanzee"...

Source: flickr.com via Susannah on Pinterest

and to just let the stress melt away.

blaithin by kate davies
isn't that first image of that blanket awesome!!! I WANT!  ohhhhh, it's so hard to not let myself get swayed by new projects to make all the time.  i've got way too many on my plate as it is...such is the nature of the beast though :P  better to have too many than none at all.  that would really suck.

this was our first week with the hubs home on a somewhat normal schedule and boy has it felt good.  we have a lot to do and i mean a lot but we've started so i'm happy. slowly but surely we are chipping away at chores, spring cleaning, work, studies and reorganization.  it feels good.  i can't wait to make a dent in it.  we've been revamping our deck this spring and i'm working away on little things for it here and there and i can't wait to show you all when it's done.  it's been raining buckets here or i would have taken a pic to show some of my new fave things to you guys.  in fact i haven't really taken any pics this week at all due to our dark grey skies and torrential downpours. i'm not bothered by the rain the first day, in fact i enjoy snuggling up inside with my knitting, coffee & the kidlets but when it keeps going.....well....it can just end already.  i need my vitamin d sky...lol. 

this weekend i will be working...working...working.  i've got some projects to finish up and a new knitting pattern i'm working on for you all plus a whole bunch of new fabric to get some commuter cowls & sweetheart dresses made to list in the shop.  i'm super excited.  i also have a new item that i will be selling in their that is my own design that i am freaking excited about. i cannot wait to reveal it but i seriously don't know when i am going to have time to do this all.  i better go take my supermommy vitamin and don my wondermomma cape, squeeze my big ol'jungas into a leotard and take on the day...lmao....anyone want to join me? i could use a sidekick...lol.


thankfully i have knit night tomorrow to calm my soul. what are your weekend plans and wishes? i hope you all have lots of sunshine, time to create, set your mind free & cuddle those nearest & dearest but most importantly laugh. i need a good laugh.  remember....as the movie annie says "you're never fully dressed without a smile". <3

the emerson tunic dress tutorial!

Main fabric: Dandi Flight from Commute by Birch Fabrics
Accent Fabric: Dottie Cream Coral from Mod Basics by Birch Fabrics
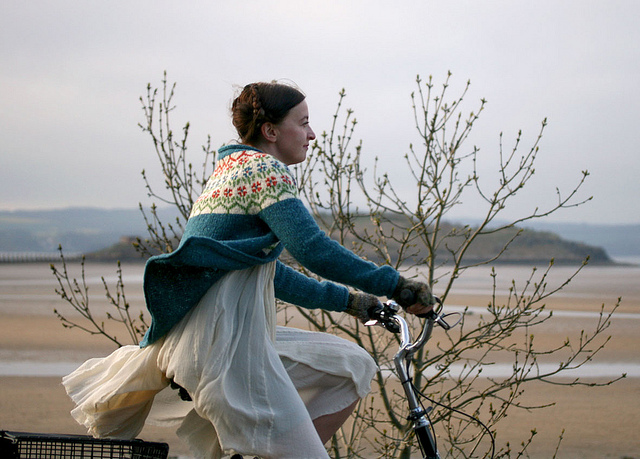
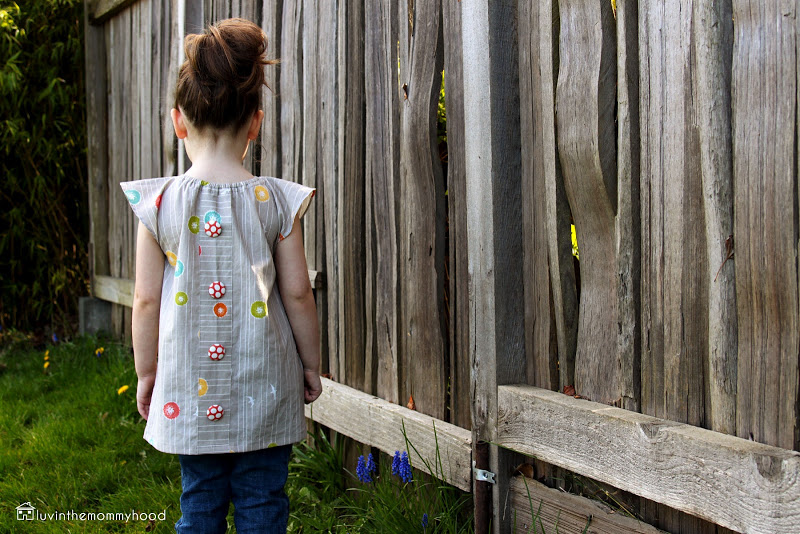
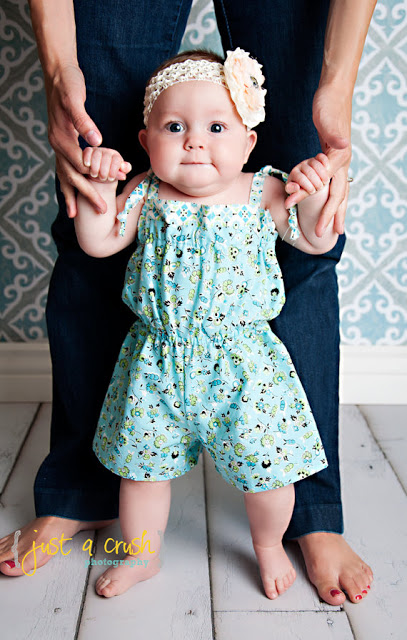
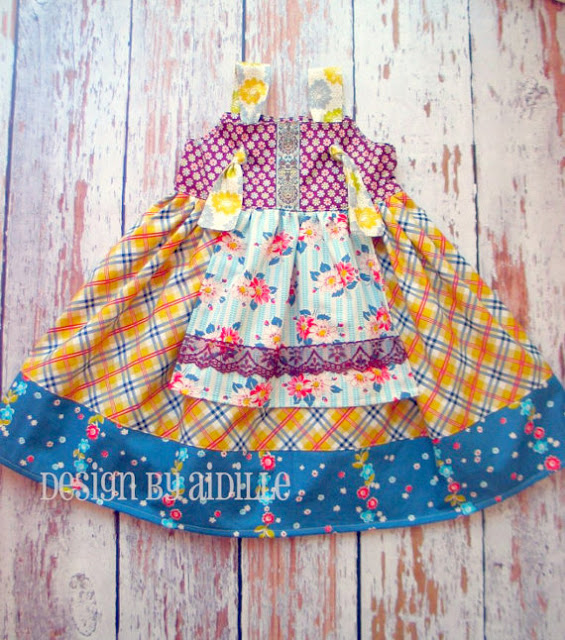
This is a special little project.  One that is very near and dear to my heart.  You see one of the first things I ever sewed was this little dress for my daughter back in 2009 (she was so tiny!).  It was so exciting to see it on other blogs and linked up and I'll never forget that feeling - it was truly when I got hooked on sewing. It literally was something I did from scratch and drew out before making it. I was inspired by dana's men's dress shirt dress but I wanted to reverse it and put the buttons on the back instead.  So when I got a chance to review some of 
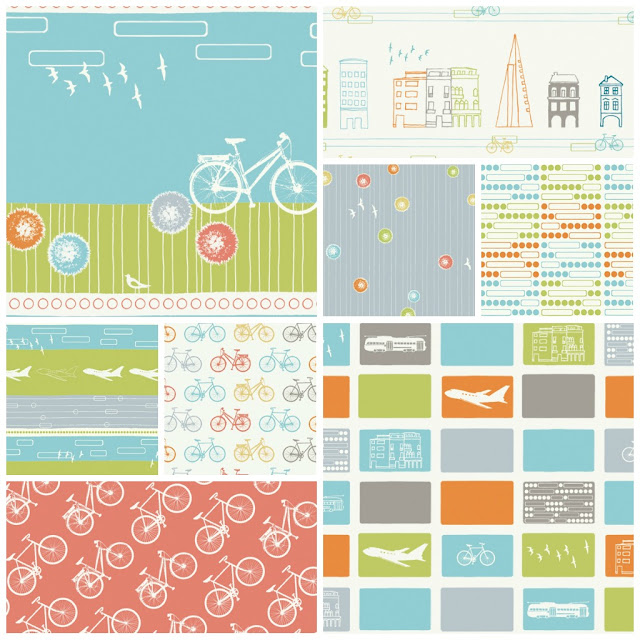
Birch Fabrics wonderful 100% organic line I took one look at the "
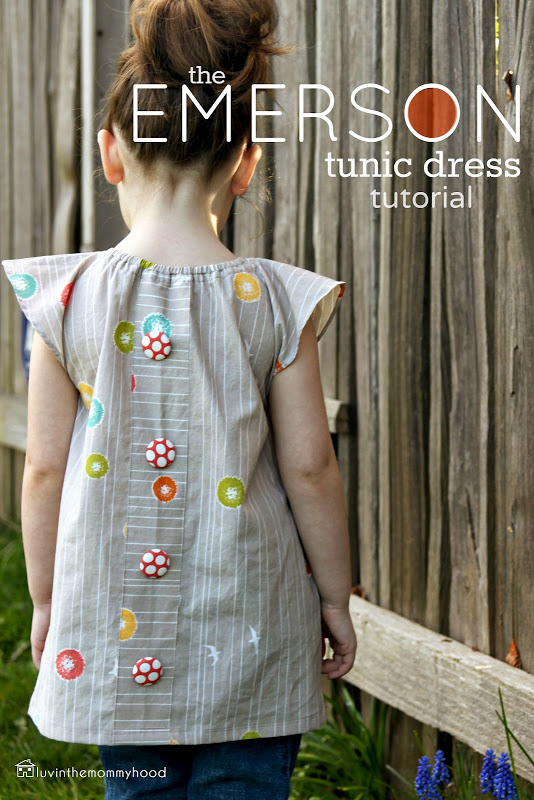
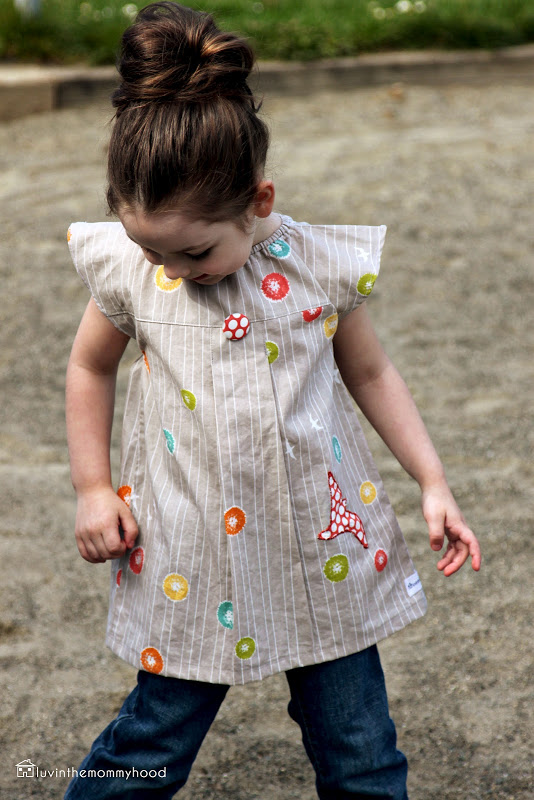
Dandi Flight from Commute line "  and knew I could finally do a tutorial for that little reverse men's shirt dress - The Emerson Tunic Dress.  


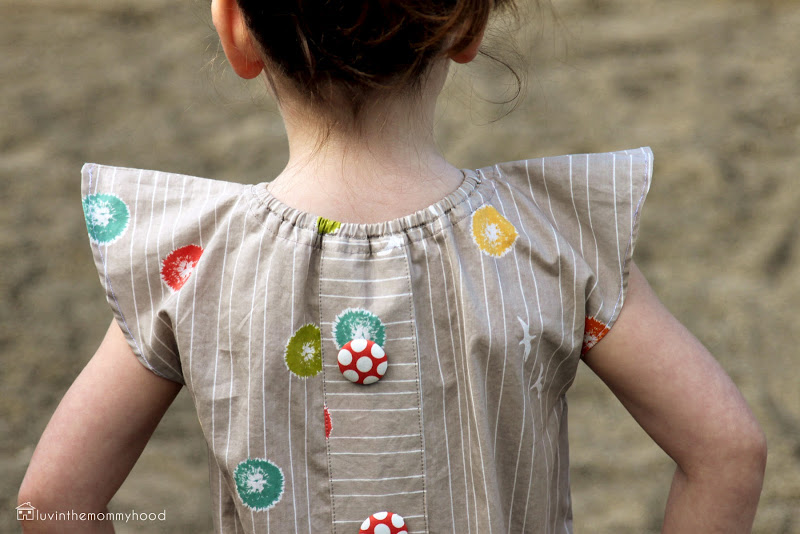
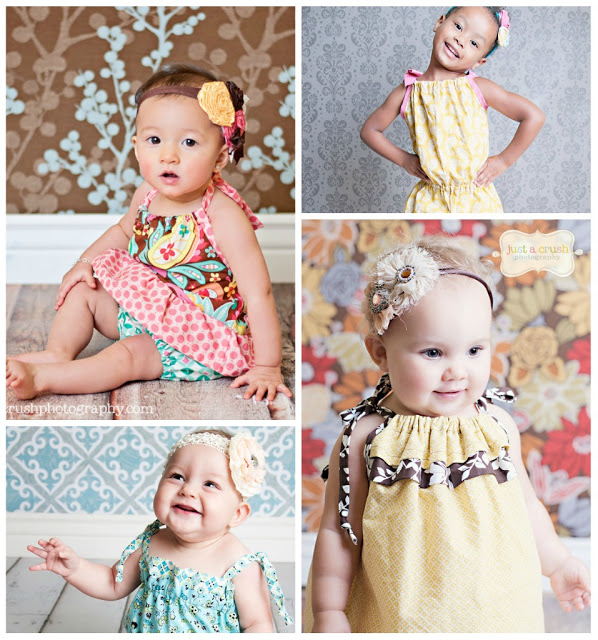
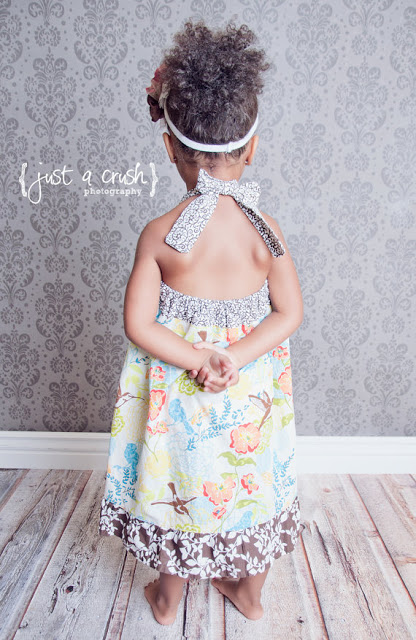
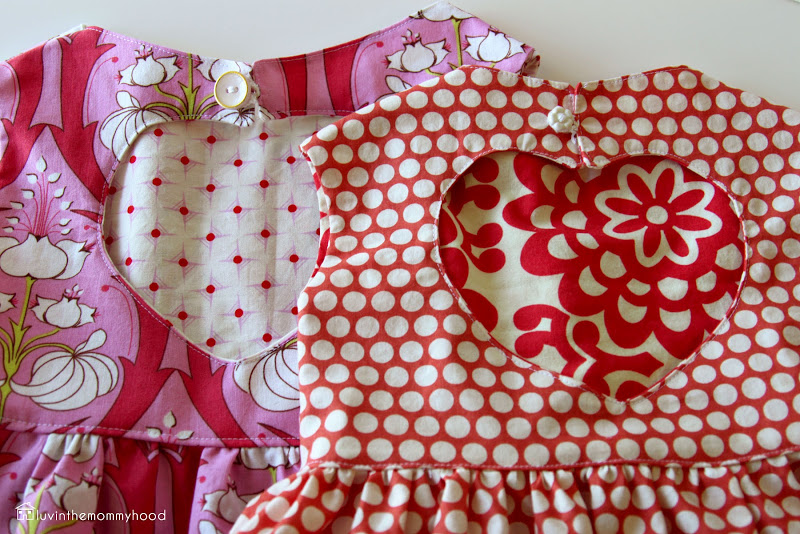
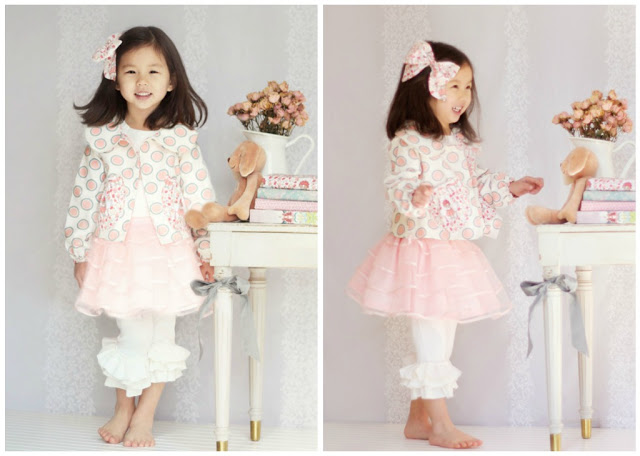
There's something so structural and modern about the sleeve shaping with the bodice and a-line skirt that i just adore. It's one of my favorite silhouettes and I have to admit I'm a bit crazy for it.  The faux button placket down the back and box pleat in the front make me swoon. There are no buttonholes in this tute ladies! Yeehaw!  All you have to do is sew on the button :)  Add a little applique, topstitching and an elastic gathered neckline and I'm sold. 


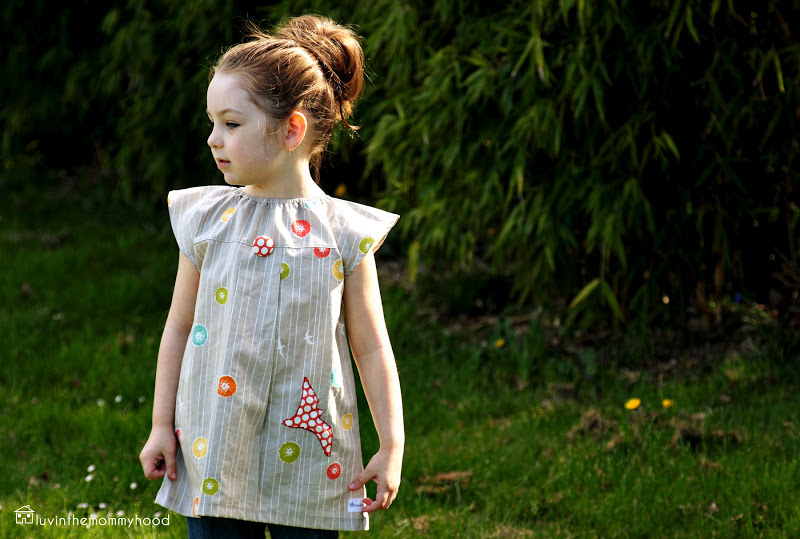
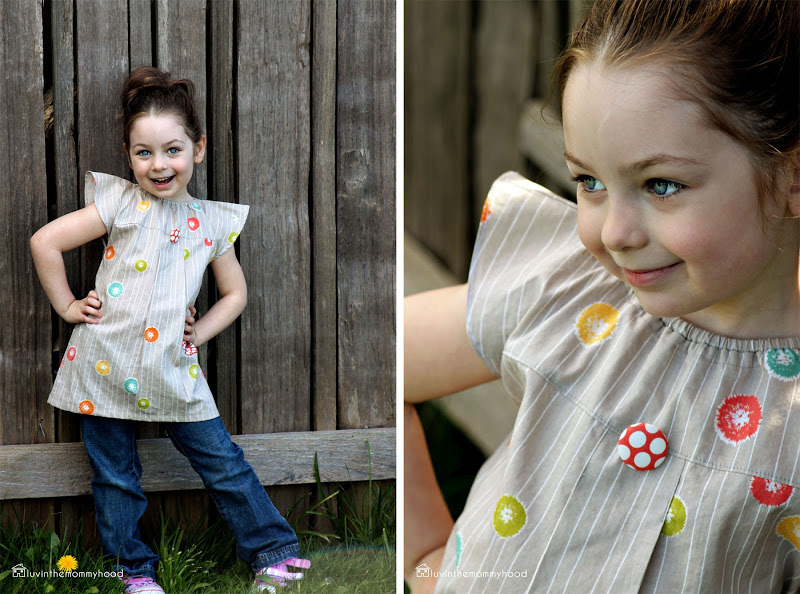
Emerson is perfect for showing off two co-ordinating prints and adding a fun flair to any outfit. Lengthen the skirt for a longer dress or keep it as is in the pattern and wear it as a tunic.  Easily adjusted to fit the size of your child and also a quick shape to fit a wide range of sizes.


So grab that new print you've been coveting, get the sewing machine out and whip up the Emerson Tunic Dress.....your kidlets will thank you :)  Just look at that smile...


Oh, and where did the name Emerson come from?  It was another one of my top baby name picks for Mackenzie.  There was a park near where we lived that I used to sit at when I was pregnant with her that was called Emerson Park and the name has always stuck with me.  The hubs used to push me on the swing nine months preggo there while i basked in the sun.  The Emerson Tunic Dress is the perfect dress to be feminine and whimsical but still wearable and ready to be lived in.


Ready to get sewing? Yay!!!! Let's have some fun!

THE EMERSON TUNIC DRESS TUTORIAL
 *Copyright 2012. All Rights Reserved www.luvinthemommyhood.com. This tutorial is for personal use only unless prior permission has been given.*

Materials:
- 1 yard quilting cotton. I used "Dandi Flight" - 100% organic cotton from Birch Fabrics from the Commute line.
- 1 fat quarter of quilting cotton for covered buttons, neckline trim detail and appliqued bird. I used "Dottie Cream Coral" 100% organic cotton from Birch Fabrics from the Mod Basics line.
- 5 covered buttons pieces & kit to make them (or as many as you would like ) or regular buttons
- hand sewing needle
- co-ordinating thread
- scissors or rotary cutter/mat
- fabric marker
- super small elastic (1/4" or less)

Pattern Pieces:
*click on the links below to print your pattern pieces. Be sure to select "no scaling" or "to size" in your printing options before printing.

Please note: these pieces were designed to fit my small 5 year old.  She is small for her age and sometimes closer to a 4T than a 5T so please check the pattern pieces against the size of your child before sewing.
- Emerson Bodice Front Upper 
- Emerson Front Lower Pieces
- Emerson Back Pieces
- Bird Template
(Once your pieces are printed tape them up matching them by numerical order. For example: 1 is the top left corner, 2 is the top right, 3 is the bottom left corner and 4 is the bottom right corner. Match the edges of the drawings (not the paper) up against each other to complete the shape. Please let me know if you have any issues as I made these pieces a few months ago and haven't tested them again yet. )

You will also cut out the following during your dress making:
- 2"H x (length of neckline + 1") for detail inside of dress on the neckline out of your fat quarter fabric (more instructions in Step Six).
- Same as above only out of your main dress fabric for neckline casing.
- (height of dress without neckline finished) x 3"W for the back button strip detail out of your main dress fabric (more instructions in Step Three).


Instructions:

STEP ONE: GATHER YOUR PATTERN PIECES AND FABRIC

*Note: If the size of your child is not a 4/5T you can still use the pattern pieces provided. They are based on a simple A-Line silhouette that has the front split up and widened to accommodate for the box pleat.  This can also be made longer for a longer dress for this age size or the sleeves/upper bodice could be made less wide for a dress for a younger child. This pattern fits my size 2T daughter but the sleeves wing out just a bit too big for her so it wouldn't take much to adjust the fit.

Print out your pattern pieces if using or draft your pattern to fit the size of your child.  Cut your pattern pieces out of your fabric.  You should have a Front Bodice Upper, Front Lower, Back, Bird (if using) and later a rectangle for your neckline casing and one for your neckline detail and a rectangle for your back button strip detail.

STEP TWO: MAKE YOUR FRONT

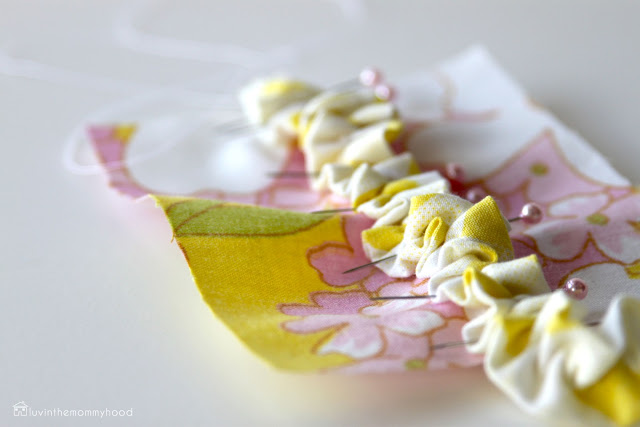
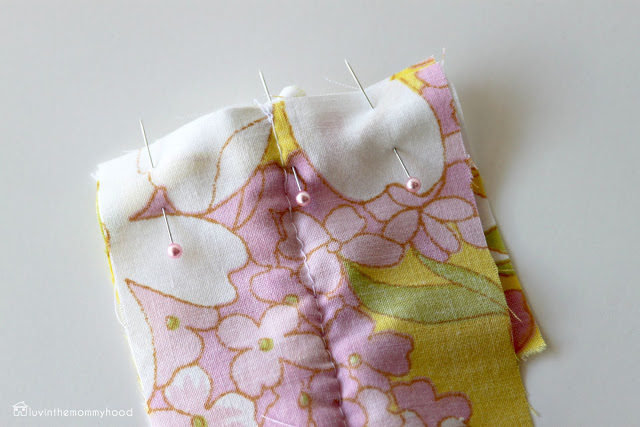
Grab your front lower piece and fold in half marking the center with a fabric marker. Now pin/fold your box pleat to be 2 1/4" wide (after sewing).  I folded mine in about approximately 1" on either side. Normally they would meet in the middle but mine do not...not sure what happened there...lol. *See image below.  Grab your Bodice Front Upper piece and match up with the Front Lower Piece and see if they are the same size.  They should match if your box pleat is the right size.


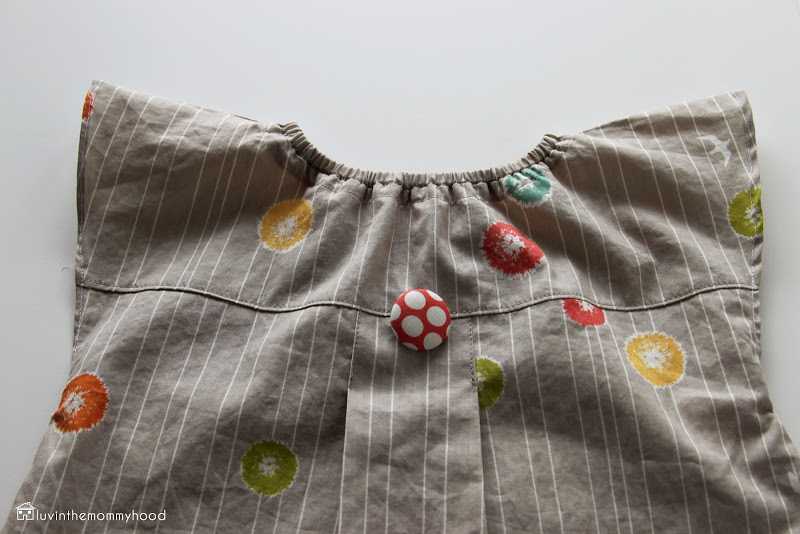
So now that your pleat is folded and pinned baste with a 1/4" seam allowance *only along the top of your pleat and press.  Now stitch down on either side of your box pleat right along the edge about 2" down from the top of your fabric.  It will help to keep your box pleat looking nice and purdy even after your wee ones played all day in her pretty frock. Press. (See pic above to see the inside of my dress. Note I've already completed the dress in this shot so you're bodice won't be attached yet.)

Grab your Bodice Front Upper piece and Front Lower and match up the bottom edge of the Front Upper to the top edge of your Front Lower right sides facing each other.  Sew together with a 1/4" seam allowance. Press.  Finish off your seams by zig zag stitching, pinking or using a serger. Topstitch along this seam with your right side (see image below).


Now we are going to finish your armholes and sides.  Fold and press 1/4" all along the side of your Front. Fold 1/4" again and press pinning as you go.  Sew this down along your inner fold edge.  This will give you a nice finish along your sleeves.  Press.  Repeat for the other side of your dress.  Make one of your covered buttons and attach it to the center of top of your box pleat. (See button pic above noting again that my dress is finished in this shot)

Now do the same finish for your Back Piece minus the button step (folding and sewing) side edges.

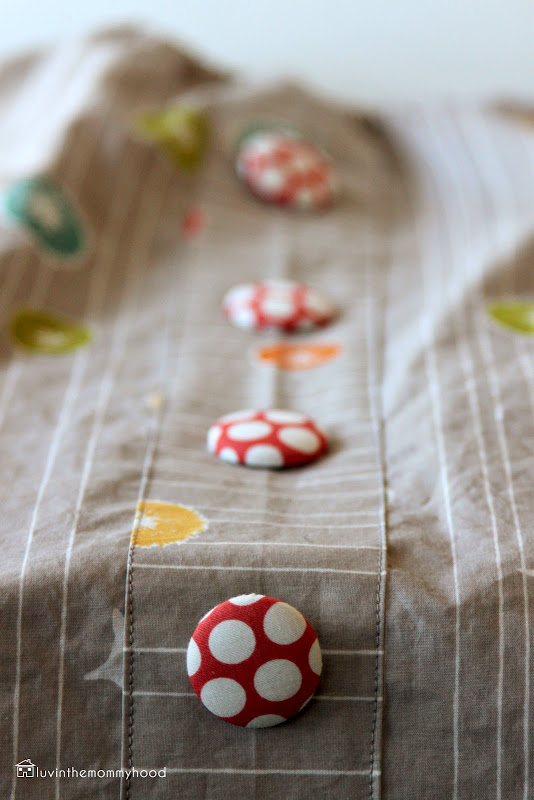
STEP THREE: ADD YOUR BUTTON BAND


Measure the length of your dress so far.  Place this measurement in your button strip calculations.  You should have your dress length measurement as your height and your strip should be 3" W. Cut this out of your main dress fabric. Take your 3" contrast strip for the button band and fold and press under 1/4" on each side.  Pin this strip down the center of the back of your dress and top stitch down along the edges of the button band.  Press.  I love this detail! So cute!   Now pick out your buttons or make your fabric covered buttons and mark where you would like them placed taking care to place buttons 1 1/2" from top neckline and 2" from bottom of dress.


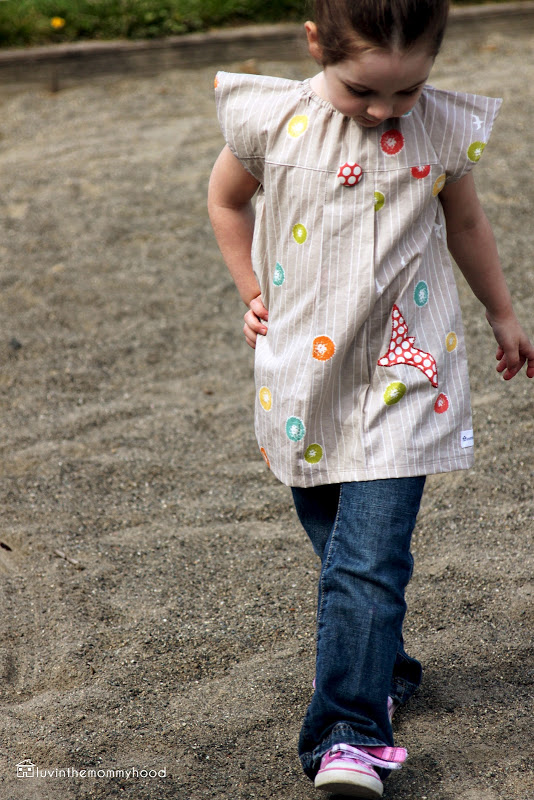
STEP FOUR:  ADD YOUR BIRD DETAIL

If you would like to add the appliqued bird to the front of your dress now is the time. There is lots of ways to do this so you can choose which one you prefer. I simply cut the bird out pinned it to the dress and hand stitched it onto the dress with embroidery floss. 


STEP FIVE: JOIN THE FRONT AND BACK

Place your Front and Back pieces right sides facing each other. Pin down along your side.  Sew this with a 1/4" seam allowance.  Press your seam allowance open so that the seam lays flat.  Repeat for the other side of the dress.

Pin your shoulders together with your right sides facing each other.  Sew these with a 1/2" seam allowance. Finish your seams with a zig zag stitch, pinking or a serger.  Press.

STEP SIX: GET THAT NECKLINE DONE

There are a lot of different ways to finish this neckline that may be easier and faster but I wanted to stay true to my original design so I tried to replicate it as closely as possible.  Bear with me...it's easier to figure out as you're making it than just reading the instructions.  It's actually quite simple.  You're basically attaching a casing to your raw neckline to feed your elastic through. Now you'll be left with a seam there that could irritate some wee ones...mine especially.  So I whipped up a pretty little detail to stitch over top that itchy seam so that it looks nice but is also not annoying to the child wearing it.

First we are going to make a casing for our elastic. Measure around the length of your neckline. Take this measurement and add 1/2" to it.  You should cut your strip 2"H x "the measurement you just calculated" long. Match both of your short ends up and sew these together right sides facing each other with a 1/2" seam allowance.  Now fold the casing in half wrong sides facing each other (right sides facing out) and press.  Pin this piece along the neckline of your dress taking care to leave an opening to feed your elastic in.  Stitch your casing to the dress with a 1/4" seam allowance.  Press.
Cut your elastic.  This is the part that I really recommend doing on your child...not the cutting that is but the measuring.  Every child is different and some like things like elastic around their neck looser or tighter than others. My girls in particular are really fussy about details like this.  I like to feed the elastic in the casing (I pin a safety pin to one end and feed it through) and then try it on pinning the elastic at a good length.  I then stitch the elastic together really well and trim my ends. 
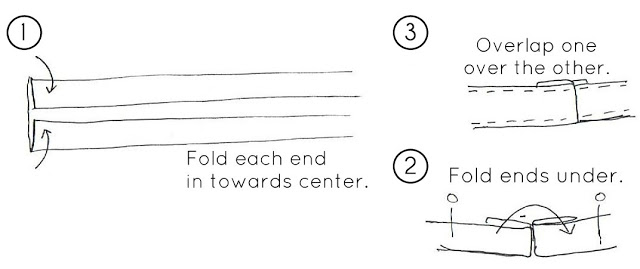
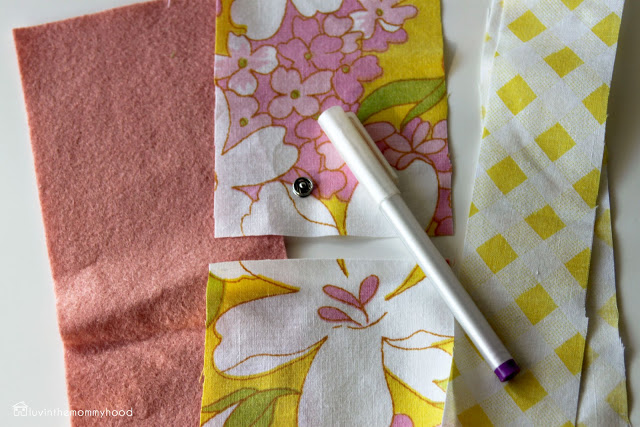
Now we're going to make a trim of sorts with our contrasting fabric from our fat quarter.  Take the measurement of your neckline again from before and add 1" to it.  You should cut your strip 2"H x "the measurement you calculated" long.  Take your strip and fold your ends under meeting at the center of your fabric. Press. See Step 1 above.

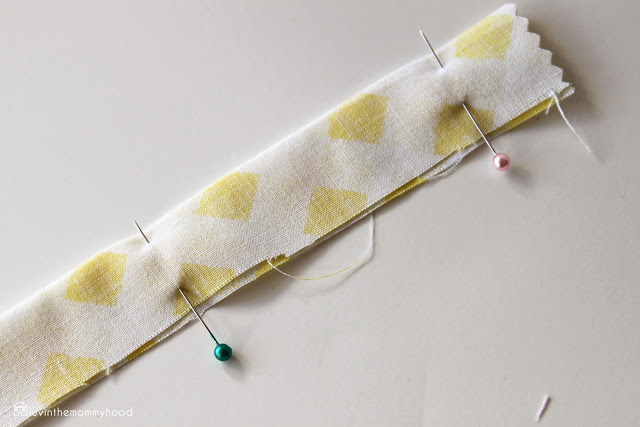
Grab your dress and pin this strip wrong sides facing each other down along and over top just slightly the bottom edge of your elastic casing seam taking care that your elastic is not in where you just pinned. You will have to stretch out the dress to it's original measurement as you pin and as you sew.  Make sure your elastic is above where you are about to sew.  Fold your ends in and under (overlapping each other slightly) to allow them to be caught when you attach the trim detail. See Steps 2 and 3 in the image above.  Stitch the strip down right along the edge of the strip all around the neckline.  Repeat this for the other edge of the strip. See image below.  The polka dot is the trim we just stitched on.


STEP SEVEN: HEM YOUR DRESS

Time to hem that dress.  Fold your bottom edge under 1/4", press, then fold under 1/2" again and press and pin as you go.  Topstitch along the hem twice. I like the detail of doing 2 lines of topstitching. You could also easily use a double needle on your machine to do this.


Attach your label and you're done!  So cute!!! Pair it with some leggings or jeans and let's go play!
A big thank you to Birch Fabrics for their wonderful line of modern/retro inspired fabrics that are a pure joy to sew and design with. Thanks Cynthia!

Would you like to make one? Which fabric would you use?  What's your favorite Birch Fabrics print? Make sure to add your finished pics to our flickr group - I love seeing your finished projects!  Happy sewing everyone!

tops, tanks & tees - la la la loving the lace

calla cami by carrie bostick hoge
oh lace...how i la la love you.  i love that lace is like a little mystery novel to me. you just never know what is going to come next.  of course after doing more and more repeats you do but something can always pop up to mix it up and make you go...aha! it's exciting and i find it hard to put down.

gemini by jane richmond
a lot of people are freaked out by lace.  when you look at it you easily can talk yourself into thinking "i can't do that". but really, if you can knit, purl and do increases/decreases you can knit lace or do lace knitting.  there is somewhat of a stigma attached to those two phrases.  don't know why but somewhere along the way someone started the trend of calling knitting that has lacework every other row "lace knitting" and knitting that is lace every row "knitted lace".  stumps me every time.  does it really matter folks? i'm not sure but whichever way you do it, like it to look, like to knit it....it's fun!  every knitter should try knitting some lace in a project at least once i say.  why not live on the wild side a bit....dude - lace knitting ain't just for grandma's ya know :P

Quill by Jared Flood
but because i do understand lace can be intimidating i've tried to break it down a tad for you and hopefully convince you to give it a shot :)

1) every item made with lace shares either of these attributes:
garter stitch - knitting every row.  garter stitch looks the same on either side.
stockinette stitch - knit one row, purl one row alternated.  there is a definite right and wrong side to your work.

2) how and when you use your increases and decreases:
every row - increasing/decreasing  (knitted lace)
every other row - increasing/decreasing  (lace knitting)

spring garden tee by alana dakos
each creates a different effect such as your lacework being more open (knitted lace) to it feeling airier (lace knitting).  overall the placement and quantities of your increases & decreases can breathe a gorgeous breath of fresh air into your knitted items. increases/decreases aren't just for shaping, they are also for creativity, design and stunning works of lace art!  from little details to all over stunners you can't go wrong with lace in my mind.

but how do you do all the stitches needed for lace? well there are many different types of increases and decreases.  yarn overs and decreases in essence create lace. you can't have one without the other. they rely on each other to create the "lace pattern" but are independent of each other at the same time.

sanderling by sandi rosner
what's a yarn over? 
yarn over (YO): simply do as written. when knitting bring your yarn forward (kind of like you're getting ready to purl) and then bring it over your needle to the back of your work again.  continue on knitting. easiest increase evah!  click here to see it done.
candewick by christa giles

what kinds of decreases are there?
you can find a ton of decreases, their explanations and videos on how to do them here.  my faves are the following:

knit two together (K2TOG)(right slanting decrease): knit 2 stitches together as if you were to knit one stitch (bring your needle knit wise into your next two stitches on your left hand needle and knit as you normally would). Click below to watch the videos:
 and
 slip slip knit (SSK)(left slanting decrease: slip one stitch and then slip the next stitch.  take your left needle and insert it into the front loops of the stitches you just slipped and knit them together (through the back loops). Click below to watch the videos:


you can also read more on knitting stitches & get a big rundown on them in last years summer sweater knit along "where my stitches at" post as well.  all in all i think lace rocks!  c'mon you know you wanna try it...all the cool kids are doing it...lol. nothing like some good ol' crafty peer pressure to get you to try something new right? j/k  but i do love lace.  i find it fun. it's not mindless knitting, but maybe that's what i love about it.  i like a challenge but don't get me wrong i like me some straight knitting as well.  i'm a gabber mouth so it's impossible for me to knit an intricate lace pattern and chat with my gals at knit night.  lace is one of those projects where you can work with your mind and your hands and enjoy that special little mystery you're making with two sticks and some yarn.....

laresca by corrina ferguson
do you love lace too?  what do you love about it? have a fear of it?  let's chat KAL projects ladies! how are your projects doing? link up your blog post in the linky below. i love visiting your blogs to see your pics and say hello.  and if you haven't signed up yet and would like to click here to get all the deets about the "tops, tanks & tee's" knit along. it's never too late to join in on the fun and boy has it been fun! best knit along ever!!!!! woot woot!

you can follow along with all things tops, tanks & tees kal here:

also, check out our awesome KAL sponsors! thanks guys!


join our linky party by linking up your "tops, tanks & tees knit along" blog post!

ruffled needlecase tutorial for ruffles 2012


Note: This post went up over on the lovely blog "see kate sew" earlier this month for "ruffles 2012" - (awesome stuff in this theme month so make sure you pop over and say hello) and I thought it would be fun to repost over here on the mommyhood for those who missed it.  I've been using mine non-stop and LOVE it.  Happy sewing!

I love little handmade treasures that are fun to make, interesting in construction, easy to personalize and add a big pop of pizazz to your sewing notion repertoire!  Anytime I can pretty up my notions and supplies I'm in!  Add a ruffle to it and I'm sold.  I've got a thing for needlecases and I thought I would show you all how to ruffle up the style of needlecase that I use.  I've noticed lately that the booklet style has become very popular but there is something about the size, shape and construction of this one that I just adore.  It's one of my fave go to gifts for special little pressies and also a good project for beginners to work on there topstitching and hand sewing. Want to know how to make one too?  


Materials:
- Scrap of outer fabric big enough to fit dimensions below (fat quarter is more than enough) I used a vintage sheet but any quilting cotton would work.
- Scrap of coordinating fabric for ruffle to fit dimensions below.
- Scrap of felt for lining to fit dimensions below.
- 1 sew on snap (size of your choice).
- Fabric Marker

Cutting Directions:
Keep in mind if  you are using a  print it will be shown vertically on your finished product so cut your rectangle with the longest length going from the top to bottom of your fabric (height wise) not from left to right (width wise). See pic below.  

- Cut (1) rectangle out of your outer fabric at 4 3/4"H x 3"W *see notes in next line.
- Cut (1) rectangle out of your outer fabric at 3 1/4"H x 3"W (if using a print make sure this matches up with the rectangle above if you'd like the print to flow). *I chose to cut one large rectangle at 8"H x 3"W and then cut the small rectangle off of the bottom of it so the print matched up great. 
- Cut (1) rectangle of felt at 7 1/4"H x 3"W
- Cut (1) rectangle of fabric for ruffle at 10"H x2"W

Instructions:

Note: All seam allowances are 1/4" unless otherwise stated.


1. Prep and cut fabrics as per the cutting directions listed above and gather supplies.


2. Let's get that ruffle ready!  Take your coordinating piece of fabric that you are using for your ruffle and fold it so your right sides are facing each other as shown above.  Pin and sew along the long open edge (you are only sewing this one side).  Turn fabric right side out by pulling through either one of your open short ends. I use a loop turner to do this but a knitting needle/crochet hook work great too. Press your tube with your seam on the center bottom so when it is ruffled you will not see the seam. You ready to ruffle?


3. Let's get ruffling! Set your machine to a basting stitch on a long stitch length.  Remember that you don't need to lock any of your seam ends so no back stitching.  Also it's helpful to leave long tails on either end of your tube. On some machines the stitch length can be set so it will just ruffle your fabric right up for you.  But if yours doesn't follow these steps: take the tube you just made and with the right side up you are going to sew one straight line down the center of the tube starting at your short end and working down to the other short end (see image above).  Remember do not back stitch and leave a long tail. 

You are now going to use that long tail to make your pretty ruffle.  Using your bobbin tail end only (this will be the thread tail on the wrong side of your fabric) pull this thread gently while sliding your fabric along your thread as it ruffles.  Do this until you get your desired amount of ruffling and the length you need for our needlecase.  In this case I did very tight ruffles and I also have a thing for making my ruffles longer than needed so I have room to play around with how tight I want them. I left my ruffle long until I pinned it on so I had room to move the ruffles and make any adjustments before I cut off the remaining ruffle length. 


4. The next step is to pin the ruffle right side facing up on your larger fabric rectangle (right side facing up) from one short end to the other short end as shown in pic (2) above with your ruffles spread evenly.  I use a lot of pins when stitching down ruffles as they move and they can be tricky sometimes to keep straight when you have as many ruffles as I do on my needlecase.


5. Get ready to sew!  Go slow here and remember to set your machine settings back to your normal settings and normal stitch length. I forgot until half way through my seam - oopsie..lol..so I knew I should remind you guys as well.  You can now back stitch and lock your ends as well.  Trim that ruffle up so it's even with your rectangle as well.  See image above. You can now choose to take your basting stitch out but I always manage to rip out the wrong one so I got a tad lazy and left mine in.  My ruffle is so tight that you can't tell unless you really inspect it ;)


6. Good job!  We're half way there!  Now grab the small fabric rectangle and your large fabric one and place them right sides facing each other and pin across the bottom short end so your ruffle is still in the center.  See where my sewing line (and my bigger stitches..oops) is in the pic above? *Hint: make sure if you are using a print and cut it to match that you have placed your fabrics so that these ends match up good because these are the ends we are sewing back together. Sew theses 2 rectangles together using a 1/4" seam allowance.


7. You should have one fabric rectangle now as shown in the image above.  Press your fabric so your seam allowance lays flat.  


8. Get your fabric marker out.  We're going to mark the placement of the snaps on your felt and outer lining piece.  With your felt lining and outer lining wrong sides facing each other measure in 1" from the bottom outer edge (the edge of the rectangle that you just stitched onto your outer rectangle in step  above) of the right side facing of your outer fabric lining (see the image after step #12 for a finished shot). Mark the center point here. *Hint: this is the part of your outer that has no ruffle on it.  Now measure in 1" from the top of your felt lining (right side facing) and mark the center here for the other part of your snap (see image 2 after step #14 for another finished shot).  Trust me, this sounds & looks above way more complicated than it is.  It's one of those things you just have to put into action. Once you have the fabric/felt together you can imagine how it will be folded and where your snaps go following the diagram above. *Note: the dashed lines represent the outer lining.

9. Using the two parts of your snap attach the female one to your outer lining and the male one to your felt lining by hand stitching or using a snap tool.  Double check that your snaps line up.


10. Now that your snaps are sewn in place we can sew the case together.  Place your outer fabric and your felt pieces right sides facing each other.  Pin & sew around the entire perimeter with a 1/4" seam allowance taking care to leave a 2" opening on one of your long sides to turn the case right side out through.


11. Trim your corners so your needlecase will lay nice and flat with a nice corner when turned right side out. Now turn the needlecase right side out.  Press your needlecase.  Pin your opening shut and topstitch close to your edge around the entire needlecase.  *Important: when you get to your ruffle lift the edges up and topstitch as far as in as you can without sewing on the ruffle itself and then backstitch and end your sewing there.  Start back up again doing the same thing on the other side of your ruffle.  It looks prettier that way and then you don't lose any of the ruffliness of your ruffle (see image above).


12. Measure down 1.5" from the top of your needlecase (the part with the ruffle) and mark this with your fabric marker.  Stitch a line across the case here to form your top flap.


13.  Measure 2.75" from the bottom of your case (the part without the ruffle) and mark this with your fabric marker as well.  Stitch a line across the case to form your bottom flap.


14. You will now have two lines stitched across your needlecase which will help in the folding of your flaps to form your needlecase.  Test your pretty new needlecase out!  Isn't it cute?  So adorable right?


Now grab all those pesky needles and load your needlecase up.  I like to keep all my needles, a few pins and some safety pins in my case.  You never know when you are going to need any of these and since I keep my needlecase in my zippered pouch with my knitting notions I use it for both sewing and knitting.

The fun thing about this needlecase is that you could totally play with the fabric combinations! Go ahead and quilt it, embroider it, use floss and handstitch the topstitching, add more ruffles just have fun and go nuts with it!  Personalize it....it's yours after all :)  I couldn't resist the combination of that pretty pink with bright sunny yellow vintage sheets to brighten up my rainy spring days.  Makes me smile just looking at it.


Want to show off your needlecase too?  Make sure you add your ruffled needlecase to Kate's Ruffles 2012 flickr group and our luvinthemommyhood flickr group.  I can't wait to see all the fabrics and the ruffles ladies!  You can find all the rest of Ruffles 2012 on See Kate Sew here!
 
What fabrics would you use for yours?  Do you have as soft spot for little treasures and vintage sheets too?  Happy sewing & ruffling!  And don't worry...there's another tutorial coming your way this week :) Yay! The hubs has a day off today for the first day after tax season so I'm taking the day off. See you on Wed!

sewing up a storm!


hello! happy monday everyone! how was your weekend?  i hope you all had a good one.  i thought i would pop in today to show you all what i've been busy working on behind the scenes.  i recently took some custom orders for my "sweetheart dress" and have been having a blast picking fabrics and sewing them up.  there's more to come too.  i've got more than a few left to sew up in the next couple of weeks.

fabric: sweet jasmine grey - daisy chain by amy butler from stitch simple
lining - stash...not sure what it is :(
i'm also waiting on some new fabrics to make some more of the dresses to list for sale in my etsy shop so stay tuned.  also a pattern may be in the works with all the bodice sizes so you can purchase it and make your own sweetheart dress!  wahoo!!!  that may be a bit more time in the making but for now i will be selling these sweet little dresses in limited batches in the shop.  keep your eyes open for commuter cowls too!  i'm so excited to get some of those out for sale for those of you who don't sew who asked me for ones.  i've got some fun and modern prints coming in to showcase the commuter cowl perfectly!  it's seriously a staple in my wardrobe and one of my favorite things that i have made/designed. love it.


i've got lots of ideas for new designs as well and will be going in my first craft sale late this summer. i can't wait.  now to find the time to blog, sew, knit, design and well....be a mommy and wife too.  not enough hours in the day..lol.  there may be a few weeks on here that i don't post here and there so bear with me.  it won't be tons but i am seriously considering taking one day out of the week not to blog so i can focus solely on designing that day.  it's something i'm really enjoying that i really don't have enough time to do at the moment.  my sketchbooks and journals are bursting and the ideas are keeping me up at night. so this momma's just gotta get them out into the world.  they are like my little babies :)


totally off topic aren't these little hearts adorable?  i keep swooning over the hearts that get cut out of the dresses and decided to send them along to the happy customer as a wee tag of sorts.  i simply zig zagged and pinked the edges for a bit of a shabby chic look and then used my pfaff ambition 1.0's letter stitching to sew the words 'the sweetheart dress' onto the heart.  stitched on a ribbon and attached it to the dress.  i thought it was a sweet touch and to go along with my business card and a handwritten card.  i luv when i receive orders/packages with extra goodies like that and i hold onto them in a special place in my sewing area.  it's the thought behind them that makes them so special.  anyone can print an invoice but it takes time and love to put that special little bit of happiness in a handmade parcel.  i hope they love their dresses as much as i do.

here's some shots of a few of the others i've made recently...


fabric: optic blossom in linen - midwest modern by amy butler from stitch simple
lining: stash...not sure what it is :(
fabric: bike it -commute by birch fabrics from fabricworm
lining: birdie spokes - mod basics by birch fabrics from fabricworm
don't they look so cute all together?  makes me all warm inside.


whatcha think? you likey?  would you like to see a pattern for sale of the sweetheart dress?  which sizes would you like it to go up to for children?  have you sewn one yet? i'd love to see it if you have!  what have you been working on?  chat, chat...and show me pics/blog posts! i love seeing what you are all up to - it's so fun!

p.s. - stay tuned...that tutorial i've been promising is up this week!! 

p.p.s - please ignore my creases...my iron sucks and is being dumped. i'm on the hunt for a new one...any recommendations?

weekend wishes

to add some color to my wardrobe to brighten up my day...

image source: style me pretty
to drink a lot of coffee...all. weekend. long...yesssss...

image source: bird and bloke
to seriously sew like a mad woman at sewing group...


to soak up the sunshine...


and to get my hands on this line of fabric...sooner than later (damn you vanessa..wink..wink).

simply color by v and co. for moda
finally, finally it's the weekend. i feel like i can breathe a little bit better.  i've got knit night tomorrow and sewing group all day sunday...yee haw!!!! i hope to be one happy momma come next week :)  i cannot wait to have multiple hours in a row of uninterrupted child free sewing time.  yessssss.....it's gonna be good. i picked up some batting on monday and i have a new friend for my sewing machine that i will reveal to you all soon and that i cannot wait to try it out.  hopefully i can get more than a big chunk done on mackenzie's zig zag quilt and finish up a few custom orders for the sweetheart dress.

i've also been having to do the dreaded deed of bathing suit shopping...oh my....lord help me.  it's scary...frightening..and needless to say i haven't found one yet and am terrified of trying on any more of them.  the one i currently own i really like but i now have the horrible see through butt happening...so not flattering.  must fix.  anybody recommend a fave place to shop for suits that is budget friendly, in style but has a bit more coverage for my lady bits so i can play at the pool without flashing the whole lot of em?  i really just wish bikini bottoms fit like my fave pair of undies too.  no tiny elastic going around my muffin top.  i really wanted a tankini this year to mix it up from always wearing a one piece. now don't get me wrong, i don't want one where my tummy is showing, just two pieces ya know.  i found one i like online but the price is hefty when you ship it with customs/duties etc. and i don't even know if it will fit. eeeekkk!  their size chart is saying i am 4-5 sizes bigger than i would normally wear.  hellooooo??????  what is wrong here people????

anyhoo...this is our home stretch for tax season. the last weekend before the deadline.  i cannot wait for it to be over.  i cannot wait to see my hubby again...ok...who am i fooling...he's not done school, but i may see him a tiny bit more than before so any amount is better than less right? 

wishing you all a crafty filled, sunshine basking, coffee sipping, deep belly laughter, non bathing suit shopping, family cuddle filled weekend <3 what are you guys up to this weekend?  what are you working on?  any fun projects planned?  weekend wishes?  comment my friends...it makes my day!  

p.s. don't forget to enter to win some fabulous organic fabric from birch fabrics and fabricworm!!! woot woot!

Pink Poodle Bows Pattern Giveaway Winners!


we've got the winners for the pink poodle bows pattern giveaway!  congrats ladies! you each win 3 patterns of your choice! wowsa! thanks again alisha!

our winners: 
kayla m. smith  and  jennifer langridge (luv how your wiksten tanks turned out!)

thanks so much for all of your entries!  and thank you again to pink poodle bows for the generous giveaway! so many cute patterns to choose from.  you can find all things pink poodle bows.

shop  |  blog  |  facebook

today was going to be a new tutorial but boy oh boy this week has been a doozie so i'm postponing it till next week.  you guys will forgive me right...lol?  have a great day and i'll be back tomorrow with weekend wishes..woot woot!

tops, tanks & tees knit along - distractions & project planning

pattern: folded by veera valamaki yarn: malabrigo sock in colorway ochre
i have a confession to make.  i've been a bad girl...lol.  i got....well....distracted.  there.  i admitted it.   i lucked out and found 3 skeins of the most gorgeous, warm & buttery malabrigo sock yarn on sale at fibers west the other month and it's been seriously haunting me from my yarn basket.  i kept getting it out and petting it and staring at it and finally i caved.  i could not resist the yarn and the lure of veera valamaki and her pattern folded.  i'm obsessed with her designs and just couldn't stop myself so i now have not one kal project but two.  i'm nuts.  i've lost it.  2 projects on small needles....eeeeeek!!!!!

folded by veera valamaki
i've admitted to myself that i will probably never get both done by the deadline but so be it.  i'm happy anyways :)  the veera pattern is knit from the bottom up so i've got some serious mileage to put in before i really need to focus on instructions so it's the perfect purse project for me right now.  i also can't seem to stop working on it due to being so smitten with the color and the feel of the yarn.  gorgeous.  but don't worry, i haven't neglected my gemini top either.  it's trucking along quite nicely.

pattern: gemini by jane richmond yarn: knitpicks cotlin in clementine
here she is!  i'm done the lace now! i'm sad to see it end.  i really enjoyed that part and will miss it.  now i'm almost at the point of separating for the sleeves which i LOVE! that means when i try it on it will look like a shirt!!! squeal! i love that part!  at that point i usually slave away on it because i just want to keep trying it on.  i love having interchangeable needles for this alone.  the ability to add my connectors to my cables so the cord is super long and i can try it on is a godsend! awesomeness at it's best!  it's great motivation when you can see it all taking shape!

a few of you are chatting about 2nd projects as well so i don't feel so guilty.  we also have had our first few participants of the kal finish!!!!!!!!!!!!! wowsa!!!! go ladies go!
 

 i've currently got a ton of project on the needles but i've also had a few finished ones too.  i keep them all balanced by time blocking them and also by taking turns carting them around in my knitting bag wherever i go.  so for instance if i have a project on the needles that's complicated i save it for nigh time knitting and if i have an easy knit i keep it in my bag at all times.  i usually have a few of each going.  i'm a gemini so i get bored easy and always need multiple projects going for each mood i'm in..lol. i couldn't resist showing off a few pics of what just came off my needles....

pattern: in threes by kelly without a net yarn: knitpicks swish worsted in lotus
i finally got mackenzie's birthday cardigan done.  the pattern is "in threes" by kelly without a net.  the yarn is knit picks swish worsted in colorway lotus.  love it!  so squishy!  i picked up the buttons on monday and swooned when i spotted them.  the diamond/crystal look of them was perfect for my little princess wannabe and she LOVES them!  pics to hopefully come of her wearing it.  the cardi fit's her perfectly with room to grow. 

pattern: classic raglan pullover by jane richmond yarn: cascade 220 heathers in colorway 8401
and then i finally got my classic raglan pullover by jane richmond off the needles. yay!!!  to say i love this pattern is an understatement.  i had my normal case of sleevitis but other than that it's a quick mindless knit that is super fun for practicing doing mods to have the pattern suit your body.  i like the fit of mine but plan on doing another one that's a size smaller.

 
the yoke and hip area on mine are a bit baggier than i'd like but that's because i was super scared the fit of the sweater was going to show off every lump, bump and overhang i had going on but now that it's made it's super flattering and would prefer it to be more fitted.  yay!  i've worn it almost every second day now!  love it so much.


the yarn is cascade 220 heathers in colorway 8401 and it's honestly the perfect shade of grey.  i always choose tones to go with my fave pair of jeans and these are perfect!  i think my favorite part of the sweater is the ribbing.  there's a story behind it on my pullover.  i was at rebecca's house (of nook) madly knitting away on my collar and binding off when i realized i knit it double the size it was supposed to be. the pattern calls for 1 inch and i knit 2.....oops...sorry jane :P  we all had more than a few good laughs at my nasty "the 80's called and wants their mock turtleneck back" collar.  heinous was being nice.  but i refused to rip it out and re-bind off.  i'm lazy like that...lol.  i was going to seam it down to have a folded neckline but it was too thick looking so i decided to block the pullover and see how i felt about it afterwards.  shock of all shocks i like it now!  haahaha...goes to show what a good blocking can do!  i always hate the way ribbing looks pre-blocking on garments.  it's all loosey goosey and looks handmade...but when it's blocked...just lovely!!!! i mean look at how purdy these are!!!

i adore how they squish up together and flatten out and just look yummy :)  it's a fun transformation.  i also like looking at this sweater all folded up.  it's like your friend.  warm, cozy and it loves you.  i keep putting it on because it calls to me in the morning...for reals....check it out...you see it right???  muahahaha....ok back to seriousness i can't wait to pop this on in the fall/winter when i'm curled up on the couch writing to all of you. 


and here i am in all my glory.  sorry for the bad pic...with the hubs not home right now i'm still waiting to get shots taken of my rocky coast cardigan and of this one.  soon i hope :)


so it's confession time ladies....how many of you have started an additional kal project?  how many of you have more than 3 projects on the needles right now?  i think i have about 6 or 7...iayayayaya!  i know i'm not alone out there...there are more of you..lol. c'mon fess up...and link up!  the linky party is right at the bottom of this post.  fill in your info and voila! all our kal posts are in one nifty place so we can go cheer each other on!  wahoo!!! 

want to join in the fun? it's not too late! here's the info my knitty pals...

start date:  april 11th, 2012
end date:  may 23rd, 2012 (the prize winners will be announced the following week)
*both knitting and/or crocheting is accepted and encouraged :)

enter the tops, tanks & tees knit along here:
*you must be entered & have started a project to be eligible for the giveaway at the end of the knit along.

you can follow along with all things tops, tanks & tees kal here:

check out our awesome kal sponsors this time round who are all generously donating some rockin' prizes for the giveaway at the end of the knit along! thanks everyone!

 enter the linky party here:

fabricworm - birch fabrics giveaway!!!

storyboek II by jay-cyn designs for birch fabrics (june 2012)
we've got a fun fabric giveaway for you all today! and not just any fabrics....organic fabrics! awesomely awesome organic fabrics at that - birch fabrics!!!  birch fabrics are 100% organic and are printed with low impact dyes as well.  they are also certified by the GOTS (global organic textile standard).  i heart them.

commute by birch fabrics
birch fabrics is run by the lovely and oh so talented cynthia who is also the owner of the popular online/brick mortar fabric shop fabricworm. the designs put out by birch fabrics are some of faves.  modern with a mix of retro in there.....just makes me smile.  they are super soft, have a lovely drape and wash well. 


i recently designed and used birch fabrics for my "sweetheart dress" and "commuter cowl" patterns.  they are so nice to work with and i can easily see them used for baby to adult projects, clothing to accessories.  my kind of fabric line!  you guys know i love a touch of whimsy and can never resist modern/retro vibes and birch fabrics does not disappoint!


i'm super excited to get my hands on the upcoming storyboek II line (due in june, first pic in post) and also the newest one coming out this august called scamper by rebekah ginda...so adorable!!!!  camp sur and camp modern are also both coming out in late summer/early fall in september and i'm dying over them....seriously! i want! check them out!

camp sur by birch fabrics (september 2012)
scamper by rebekah ginda for birch fabrics (august 2012)
camp modern by birch fabrics (september 2012)
needless to say birch fabrics is one of my favorite fabric lines at the moment and i just can't get enough of it in my stash so i figured you all would love some too!  want to know what the prize is?  here ya go....


- one lucky winner will win 2 yards of a birch fabric of their choice from fabricworm! wowsa! thanks cynthia!  so sweet of you!


- simply enter your info into the google doc linked below and when you enter your info you are designated a number by google doc based on when you enter.  this will be the number i use to correlate to your name when the winner is chosen.  make sense?  if you have any questions just ask me below in the comments.  click below to enter the giveaway:


- the giveaway is open until may 1st, 2012 midnight, pacific standard time.
- you must enter a valid email into the entry form or you will be disqualified.

circa 52 by birch fabrics
you can also read more about cynthia here in our latest "moms in the mommyhood" interview.  thanks so much again cynthia and good luck to all of you!  you can find all things fabricworm and birch fabrics here:
fabricworm:

birch fabrics:

do you have a favorite birch fabrics line?  which one are you coveting? do you try to sew with organic fabrics?  i'd love to know!

moments in the mommyhood - you know you're tired when...


you know you're tired when.....you pass out in a swing.  poor little harper fell fast asleep the other day in the swing at the park.  i don't mean just lightly napping either.  i mean out cold.  she went from this.....


to this...


to this...


and she's out.  i carried her the whole way home and she never even blinked.  that's tired.


this has been a rough couple of weeks for our little family and this week is our hardest one of the year so please bear with me.  i feel exactly like my little one looks...exhausted.  wiped out.  burnt out.  you name it....we are pooped.  we are ready for daddy to be home again and to be a somewhat normal family.  this tax season has felt so hard and long.  i think coming right off his studies/full time work and then straight into tax season has made it feel double the length.  plus as soon as tax season is over next week he starts another course and then it's massive study time for 2 1/2 months before he writes his big exam.  i keep finding myself longing for it to be fall and for this to all be over but at the same time i don't want the girls to get older, i don't want the summer to pass without basking in the sunshine holding my hubbies hand and listening to the girls laughter.

i know he's just as exhausted as i am so we're just trying to hold it together till next week but man has it been hard.  i don't know how he does it and i don't know how i do it.  no tips here..lol.  i'm hanging on by a thread this week ladies :)  i feel like each week that goes by i'm just fighting to hold on to  my beans and stay true to who i am before i get lost in the giant pile of what used to be 4 loads of laundry and is now 6 on my bed.  i'm fighting off the "green eyed monster" (aka berenstain bears..lol) & the longing to be one of those families whose hubby leaves at 9 and comes home at 5 and they have the weekends all together.  i long for those days and can't wait till that's our house.  it would sure be nice to not cry over chores and the overwhelmingness of it all.  being a mom is sure hard some days peeps...lol.  i think i need a vacay..lol.  anyone care to join me?  i'd love the company :)

ok enough whining....sorry for my whoa-is-me fest today but it's one of those mornings when things seem harder than i know they are so in order to cheer myself up i've got a giveaway for you all tomorrow and hopefully a new tutorial on thursday!  yay!!!!  plus i'm knitting up a storm and working on sewing up some custom orders too!  so fun! 

the sun is shining here and i've got a little girl beside me just itching to play so this momma is going to go enjoy the morning.  i hope you all had a wonderful weekend and thank you all so much for your sweet birthday wishes for my 5 year old! she had a wonderful bday weekend!

are any of you "hanging on by a thread" this week?  do you have partner whose schedule is really hard?  how do you deal with it?  how do you balance it all out and still stay you amongst the chaos?  are any of you a "tax widow"? i'd love to hear from you <3

weekend wishes

that my baby girl has a wonderful 5th birthday!!!!


keeping it short and sweet today folks.  my weekend wish is to make my little girl as happy as can be this weekend.  it's her 5th bday today!!! cannot believe it!  i'm a crying fool!  she's truly my "angel baby".  not because she's so well behaved...though she is...most of the time..haha..but because i didn't think i would be able to have kids and voila  - there she is.  truly my little miracle angel baby.  i'm in shock she's 5!  seems like just yesterday i was wearing her in a sling.  she's so special and this birthday seems to be the most exciting one for her yet!  so i'm off to plan the rest of the weekend for my baby girl.  i'll be back next week with weekend wishes...i promise :)


in the meantime pop on over to whipstitch to check out their newest sewing course - "sewing for your home"! seriously...deborah's online sewing courses are rockin! check out the stuff you get to make and learn! wowsa!!!!!! the amount of projects you are making is so long i didn't even list it! you just have to go check it out! amazing!  she truly has one of the best online classes there is and they are designed for the confident beginner and are even great for an experienced sewer to brush up on their skills and learn some new techniques while making some fun home decor projects!


you can find all things whipstitch here:


wishing you all a wonderful, smiles, blue skies, sunshine, laughter, cupcake & coffee filled kinda weekend!  i've got a new tutorial for you all on monday hopefully so stay tuned!!!  have a great day!  what are your weekend wishes this week?  any special plans this weekend?  what projects are you working on? it's friday!!!! weeee!!!

Pink Poodle Bows Pattern Giveaway!


you guys in the mood for a giveaway? i am :) how about a fun sewing pattern giveaway?  you in?  yay!  pink poodle bows is a fab shop filled with adorable patterns for your wee ones!  patterns sized for babies, toddlers and kids! she's got it all.  skirts, dresses, rompers...all cute, cute, cute!  just look at all this cuteness going on!


swoon! alisha's patterns are designed with the beginner seamstress in mind and come right to your inbox in pdf form with lots of colored pictures, and detailed step by step instructions.  this talented and busy momma of 2's shop has a great variety of styles and variations that make me instantly start daydreaming about fabric combinations!  the possibilities are endless!


pink poodle bows even allows you to sell small quantities of your patterns in your etsy shop!  what a great gift or addition to your wee ones wardrobe would any of these adorable patterns be?! love em!


you guys ready to win some prizes??? 


- 2 winners will each win 3 patterns of their choice from "pink poodle bows"!!!  yay!!! thanks alisha!


- simply enter your info into the google doc linked below and when you enter your info you are designated a number by google doc based on when you enter.  this will be the number i use to correlate to your name when the winner is chosen.  make sense?  if you have any questions just ask me below in the comments.  click below to enter the giveaway:


- the giveaway is open until april 23rd, 2012 midnight, pacific standard time.
- you must enter a valid email into the entry form or you will be disqualified.


good luck everyone and thanks so much for the giveaway alisha!  you can find all things pink poodle bows here:

shop  |  blog  |  facebook

which patterns would you choose if you won?  what fabrics are you dying to use to make a pink poodle bow pattern with? let's chat sewing ladies!  

handmade olympics 2012!


hey you guys...it's time for the handmade olympics over on the fab blog the rikrak studio and i'm thrilled to announce i made it to the top 10 for "favourite blog with a handmaking focus"!  i'm so excited!!!!! my competition is ahhhhmmazing!  i was totally giddy just to be included amongst them.  if you would be so kind could you go and vote for lil'ol me?  i'd love, love, love your support! you guys are the best!  thank you so much in advance...and while you're at it go vote for the other 6 categories!  there's lots of handmade goodness galore going on over there and some sweet prizes too!!!! wahoo!!!


and you can find all things the rikrak studio & the handmade olympics here:

blog  |  shop  twitter

Tops, Tanks & Tees Knit Along - Understanding Fit with Guest Jane Richmond!

pattern: gemini by jane richmond yarn: knit picks cotlin in colorway clementine
it's kal day!  i heart kal day.  there is something so fun about following along with all of your projects and working away on mine knowing that i have people to share it with.  we all cheer each other on, help each other out and just have a good time knitting.  this kal has started off with a bang!  you guys have been doing me proud chatting amongst each other in the ravelry group - it's been so exciting to watch!  and truthfully it makes me want to knit more and knit faster...in a good way :)


i have been so addicted to my gemini.  jane's pattern is fun and boy does it knit up fast!  i have hardly had any time to work on mine this past week and it's growing along quite nicely! i hope to get some more time on it this weekend.  if any of you have been scared to work on lace before don't be.  there's something so mysterious and a tad exciting about knitting lacework. i get a kick out of it!


so amongst all the wonderful conversations in our ravelry group some of you requested we try a linky party so we can all link up our blog posts to show of four works in progress.  i'm willing to give it a go if you are.  i'm using a linky service that is a list only due to the fact that the pretty one that shows an image is no longer free :( bummer.  i hope you link up anyways. i'd love to be able to pop over and say hello!  simply enter in your info at the bottom of this post.  another topic that has been chatted about is fit.  so i thought who better to come and guest post about fit, ease and pattern choices than the lovely (and one of my besties) and oh so talented jane richmond herself!


Aren’t you excited for Tops, Tanks and Tees!? Shannon always hosts the best KALs and this one will be no exception. I’ve know Shannon a while now and I can honestly say that you guys are some of the most lively, positive, and enthusiastic readers I’ve ever seen and I can see why Shannon is so driven to deliver great posts for you!

Shannon gave me a little feedback on what makes some of you a little unsure when deciding to tackle a garment for yourself so I thought I would talk a little bit about setting yourself up for success...
There are a zillion factors that lead to a successful knitting project, but one that is extremely important to us ladies is fit. It can make or break a project. Here are a few things to consider once you’ve selected your pattern...

Understanding Measurements ::


If there is one topic I cover the most through pattern support its sizing and how to choose. Patterns offer many, many measurements to give you the best picture of how something will fit and to aid you in choosing which size to knit, the trouble is, if you don’t understand how these numbers relate to your own body, they aren’t very helpful and can be really confusing.

I’ve found that patterns normally fall under one of these two categories:

Garment Measurements Only

At the very least a pattern will include Finished Measurements, numbers representing the measurements of the finished garment. This type of pattern normally includes a note about the way it’s intended to fit, for example you might see something like “Sample shown measures 33 inches, with 1 inch of negative ease”. This means that the model is wearing a size that measures smaller than her actual bust size by 1 inch (ie. she is a 34 bust and the sweater measures 33). What does this mean to you? Well, if you’re after a garment that fits the way it’s shown on the model then you’ll need to chose your size based on 1 inch of negative ease. For example, if you are a 36 bust then you’ll need to knit the 35.

Sizes + Finished Measurements
Sometimes a pattern will include Sizes as well as Finished Measurements. Sizes are listed with the intended fit/ease already factored in. Sizes represent body measurements, and are based on the way the design is intended to fit. You might see something like this listed for sizes “To fit bust: 32(36, 40)in”, accompanied by garment measurements that look like this “Finished Measurements: 31(35, 39)in bust”. This example represents the same fit as my first example, you’ll see that the middle Size is intended to fit a lady with a 36in bust, and the Finished Measurement for her size is 35, which means that this garment was designed to fit her with 1 inch of negative ease.
Classic Raglan Pullover by Jane Richmond knit with zero ease.
Choosing your Size ::

Now that you have a better understanding of what all of those numbers mean you can make an informed decision on how you would like your garment to fit and choose a size that you will be happy with.

So we talked a little bit about ease and how it’s written into some patterns but what if you don’t want your garment to fit the same way it fits the model. What if you want it to be more fitted or looser perhaps? If you still don’t quite understand how ease relates to your own body try measuring some of your clothing. Do you have a fitted pullover or a nice comfy sweater? ...lay them flat and measure the chest, how do they relate to your own bust measurement? ...are they larger or smaller. Are you starting to understand how this ease thing works? There are a few other factors like weight and gauge of the fabric your garment is made of, also the type of garment (ie. I wouldn’t use the comfy sweater as a guide for how much ease I want in the fitted tank I’ve chosen to knit for the KAL), but you get the general idea.
Classic Raglan Pullover by Jane Richmond knit with 2 inches of negative ease.
 Choosing your yarn ::

If you are substituting yarns keep a few things in mind. Firstly, chose a yarn that has either the same fibre content as the recommended yarn or at least contains fibres that possess the same qualities as the yarn that was recommended. Secondly, match the yarn weight as closely as you can. Variations in yarn weight can result in very different fabric elasticity and density. Even if you are able to get the right gauge by changing your needle sizes doesn’t mean you’re garment will turn out anything like the sample in the photos. Why is this such a big deal? Well, if the pattern calls for negative ease and your fabric is too tight it might not even fit your body! Negative ease requires the fabric to stretch when worn.

Make it your Own ::

The best way to ensure a garment fits you well is to not follow the pattern blindly. Use what you’ve learned about Body Measurements, Garment Measurements, and Ease and determine before even casting on, how your project will fit you when it’s done. If you discover areas you aren’t happy with take the time to read over the pattern, study the schematic, and decide if you are comfortable making a few changes to get a better fit. Most shaping can easily be moved up or down to accommodate a high waist or low hips, and adding overall length is probably one of the easiest things to do. Planning ahead is the key. If you are working a garment top-down you can easily change things like chest or sleeve circumference simply by doing more or less increases for that section of the yoke. And waist shaping is a breeze when you can try on as you go, you may even decide to add more shaping depending on how it’s fitting. The sky is the limit!

Just remember, if you decide to make any changes, even minor ones... TAKE NOTES! Because trust me, you won’t remember ;)

Thanks so much for having me as your guest Shannon! You know I could go on forever with this stuff! I’m really looking forward to watching the WIPs develop, this is going to be such a fun knit along.

you can find all things jane richmond here:

website  |  blog  |  shop  ravelry  |  facebook  twitter

thanks so much jane! love ya hun! i'm going to be referring to this post lots! so let's see those projects!  show me your cast ons...your yarns...your patterns...and let's get knitting those tops, tanks & tees together!  join in the conversation...it's never to late to sign up for the knit along! 

here's the rest of the knit along info:

start date:  april 11th, 2012
end date:  may 23rd, 2012 (the prize winners will be announced the following week)

*both knitting and/or crocheting is accepted and encouraged :)

enter the tops, tanks & tees knit along here:

*you must be entered & have started a project to be eligible for the giveaway at the end of the knit along.

you can follow along with all things tops, tanks & tees kal here:


please take a moment to check out our fabulous kal sponsors! thanks everyone!!!


Rerversible Sewing Machine Cover Tutorial with Martha Stewart Crafts!


Oh my gosh you guys, I have been so excited to share this project with all of you!  I cannot believe how lucky I am to have gotten a chance to be a part of the Martha Stewart Mother's Day campaign sponsored by Plaid Crafts!!! I mean wowsa!  This was a dream come true!  It was like Christmas when the super generous box of goodies from Martha Stewart and Plaid Crafts showed up on my doorstop. I'm not kidding around when I tell you I almost fainted right over.  Still makes me giddy to just look at it all and it most certainly gets my creative wheels spinning.  So. Much. Good. Stuff.


I decided after regaining my composure a few weeks...ahem...I mean days later to make for my mother's day tutorial a Reversible Sewing Machine Cover.  My mom recently renovated her basement and finally has her very own craft room.  I figured a little love and color would be the perfect thing to spring up that lovely little space of hers. What crafty momma wouldn't want to prettify their sewing machine with some Martha love right?  My very own Poppy the Pfaff is loving this one :)

I've been wanting to whip up a sewing machine cover since I got my new machine last year and I knew I wanted something a tad different.  I wanted some vintage and some modern and I wanted a bit of patchwork goodness.  When I found out the Martha Stewart Crafts Paints could be used on fabric I pretty much did cartwheels across my living room. Sold. Right there. The colors are gorgeous and the stencils are super stylish.  I knew they would look fabulous on fabric and would be the perfect fit for a sewing machine cover. It's like a rockin' dress for my sewing machine...and it's even reversible! So if I get sick of one side I can just flip that bad boy over and voila - a brand new look!


But let's not forget about those cute tabs! I also wanted to test out my newly found buttonhole making skills.  Practice, practice, practice right?  I think the button tab details on the front and the back of this fun sewing machine cover add a little detail and pizazz to the normal ribbon tie variety you usually see.  Plus I just love me a button.  Always adds a little pop of happiness to a project.

Do you want to learn how to paint your own fabric and make one with me? YAY! CLICK HERE to read more about how I painted my fabrics with the Martha Stewart Crafts Paints and also for the TUTORIAL to make your very own Reversible Sewing Machine Cover!

oh martha...i heart you!


holy bananas folks! check out the loot in the pic above! i am one lucky lady!  i couldn't resist showing you all a shot i took of all the oh so lovely goodies that plaid crafts sent to me for the martha stewart mother's day campaign that i am part of with blueprint social when this box showed up at my door i think i might have screamed loud enough to scare my neighbours....seriously...it was nutso in our house.  like 10 christmases put together in one..lol.  the kidlets fed off my energy and we all just stood around the box pulling items out and squealing more and more. thankfully the hubby was not home to see such fanatics going on...he would have razzed me for years to come and i never would have lived it down :P

stay tuned this month as crafty bloggers all over the blogosphere (myself included) whip up some fun tutorials for mother's day using the goodies you see above.  to say i am excited is an understatement.  i get to paint on fabric....yep, i'm a happy girl folks.  oh martha.....i heart you!

just in case you don't want to wait for my upcoming tute to find out more about plaid crafts (thank you plaid crafts!!) and the fabulous martha stewart crafts paint line you find more about them below:


i'm taking it easy today and weekend wishes will be back next week.  the kiddos are still under the weather, i'm fighting off a bad cold  and so is the hubs so oj and knitting it is on the menu for me.  what are you up to this weekend?  are you a fan of  the martha stewarts crafts line as well?  have you tried painting on fabric before?  have a wonderful, martha stewart kinda weekend filled with sunshine, good health, laughs, family and lots of coffee! see you on monday!

find my post disclosure here.

SWEETHEART DRESS SEWING PATTERN

SWEETHEART DRESS SEWING PATTERN ||  BUY NOW
*Updated: please note that due to the full sweetheart dress pattern being released i have decided to take down the free tutorial. I have given this a lot of thought and feel that the new pattern reflects all the hard work that has been put into it and the instructions are more clear and easy to follow.  I don't want there to be any confusion between the two sets of written instructions.  This momma is also trying really hard to earn a living with her passion in life to create.  I value each and every one of yours support and thank you so much for allowing me to do what fills me with joy.

a retro & modern dress featuring an adorable heart cutout on the back that your child is sure to adore! with a flattering silhouette that showcases your fave fabric crush and special feminine details The sweetheart dress is sure to be a showstopper!  the pdf sewing pattern is sized for 2T - 6T and i can't wait to see the wonderful and lovely dresses you are all going to make!


the sweetheart dress pattern features:

: : digitally drafted & professionally graded pattern pieces for the bodice & heart cutout

: : 18 page full color pdf pattern complete with clear & easy to understand step by step instructions with bright photos and digitally drafted diagrams

: : pattern pieces for sizes 2T, 3T, 4T, 5T & 6T

: : instructions for a professionally finished garment featuring a tutorial for a feminine, hand sewn button loop and also a fully lined bodice (with no hand sewing! woot woot!).

: : size charts, fabric requirements, notions, and sewing tips/glossary to ensure a great fit

: : a fun sewing experience :)

the sweetheart dress pattern is available for purchase at the following:

.....MORE SHOPS COMING SOON! 
 
I have a few sketchbooks...ok...more than a few sketchbooks filled with ideas for goodies to make for the girls and myself and this little dress is one that has been nagging at me to get made. So with Easter upon us last week I decided to whip them up for the girls to wear to Easter dinner.   There is something so completely adorable about a high neck fitted bodice and gathered skirt that makes it one of my go to silhouettes for dresses for the girls.  I love that it feels retro but still modern and clean.  Don't be fooled by the front though, the party is all in the back on this dress folks.  The feminine heart cut out just makes me swoon.  With a hand sewn button loop and girly button it makes me smile and makes them smile too.  They love them and I love that they love them.

Small Dress: Outer fabric is 100% Organic Dottie Cream Coral by Birch Fabrics from their Mod Basics Line provided by Fabricworm and is lined with Amy Butler Lotus Wallflower in Cherry from stash fabric.  Large Dress: Outer fabric is Amy Butler "Passion Lily Cerise Pink" from the Soul Blossoms Passion line provided by Stitch Simple and lined with stash Nicey Jane fabric.

You never know when sewing for kids if they are truly going to enjoy wearing a handmade garment.  My oldest loves dresses but wears mostly leggings and tee's.  So for her to really wear and enjoy this dress did my heart good.  Now Harper, well she just goes gaga for any pretty dresses and will proudly prance around in her new frock for all to see. She is also a very willing model when I'm drafting and measuring to sew something for her.  She gets all excited and stands on a wee stool next to my sewing chair so she can watch me work.  I think I may get a sewer out of this one :)


I couldn't resist using some of my fave Birch Fabrics for Harper's Dress (from my awesome sponsor Fabricworm).  I love their 100% organic fabrics. They are super soft, have a gorgeous drape and are great for the environment.  Plus all the prints are retro and modern which I adore.  The print I used is called "Dottie Cream Coral" from their Mod Basics Line. I lined it with stash fabric that I cannot for the life of me remember the name of.  If anyone recognizes it please let me know.


Mackenzie's dress was made from Amy Butler's Soul Blossoms Passion Line and it's Called Passion Lily in Cerise Pink and it's from my lovely sponsor Stitch Simple (whose fabric comes to me prewashed and pressed)!  I love the colors in this fabric and lined it again with some stash fabric that I had been holding onto but cannot remember the name of either.  I think I've got a bad case of the mommy brain this morning.  With 2 kids sick with the croup and 1 hubby sick now too I'm pooped!


 a full 18 page full color PDF sewing pattern for sizes 2T-6T!!!

Would you like to make your wee one too?  Want to know how? You can purchase the Sweetheart Dress Sewing Pattern here:
.....MORE SHOPS COMING SOON!


I bet yours looks fabulous!  Does my heart good.  Have fun making yours and make sure to share your pics in our flickr group here or in the comments below. I love seeing your fab projects!  Happy sewing ladies!


P.S. How can you tell our family loves color??? lol!

What do you guys think? You likey? I likey :) What do you do to get the perfect fit for a child's bodice? Any magic techniques you have for sewing a lined bodice? I know we would all love reading each others tips below. What fabrics would you use for your Sweetheart Dress? I've got coffee with your name on it - come chat with me!

tops, tanks & tees knit along - casting on & knitting in the round!

pattern: gemini by jane richmond yarn: knit picks cotlin in colorway clementine
it's cast on day today everyone!!!! woot woot! are you pumped? i am!  i've been dying of excitement to get started on my gemini top by jane richmond!  i love doing a bit of lace knitting and this top has been super fun so far! over the last week i was swatching and petting my yarn in anticipation of this day.  boy was it hard to wait 2 weeks to cast on.  how did you all like the 2 week heads up?  any thoughts you'd like to share?


i'm doing my gemini on size 4.0mm needles and the lace portion on 3.75mm as stated in the pattern.  my gauge in the round was spot on so i'm hoping i do ok.  i always get nervous at this point even after swatching that i may end up with a wonky outcome because i'm a loose knitter...lol.  it's my first time knitting a garment from this kind of fiber (cotton/linen) and i want to make sure i do it correctly.


just in case some of you had more questions about your gauge and swatching make sure you go back and read last week's post.  for the rest of you i've put together a few handy links for help with casting on, accessories and also a special guest post i did in february on knitting in the round.  some of you are knitting a garment for the first time and most of you will hopefully be knitting in the round.  there's lots of tips, tricks and handy links in that post.  almost 90% of the time when i'm knitting in the round i'm using the magic loop method.  i love it.  it's my fave.  i hardly ever use double pointed needles and/or fixed circulars.  all my knitting is mostly done on my babies - my knit picks nickel plated interchangeable knitting needles.  the post i linked to below will go over a bit about choosing your needles for working in the round as well.

- how to's for knitting in the round
- my knitting accessories
- casting on stitches with knittinghelp.com
- casting on over at knitty.com

don't you just love matching your knitting to your stitch markers <3
when it comes to casting on i'm smitten with the long tail cast on.  it's fast, easy and gives a nice ease/stretch to the edge of your garment.  ever since i learned it last year i pretty much cast everything on with it.  but there are definitely many other ways to cast on your garment.  some can be used for most projects and others are designed for different kinds of effects and edges.  if you check out the links listed above you're sure to find one that works great for you.


i have a feeling a lot of things (chores and work included) are going to get cast to the wayside while i'm working on this lovely.  i can't stop picking it up and i'm dying to keep working on it.  there have been a wonderful assortment of patterns chosen, lovely yarns picked and fun topics being discussed over in the ravelry group as well.  be sure to pop in and join in!  it makes the kal that much more fun if you can share your progress with the whole group :)  also if you blog about your project for the kal please let us know either in the group or here in the comments - we can't wait to see what you're making!

and here's a button if you would like to sport one.....

luvinthemommyhood
here's the rest of the info my knitty pals...

start date:  april 11th, 2012
end date:  may 23rd, 2012 (the prize winners will be announced the following week)

*both knitting and/or crocheting is accepted and encouraged :)

enter the tops, tanks & tees knit along here:


*you must be entered & have started a project to be eligible for the giveaway at the end of the knit along.

you can follow along with all things tops, tanks & tees kal here:


what project are you working on?  do you like using the magic loop method or are you more of a dpn's kinda gal?  any spring/summer yarns you are just swooning over?  let's chat knitty goodness folks i'm still dealing with 2 kiddos with the croup so i could use a happy distraction!  i'm so happy you're joining in!

i'm also thrilled to announce that we will be having some awesome kal sponsors this time round who are all generously donating some rockin' prizes for the giveaway at the end of the knit along! thanks everyone!

Violette Fields Patterns - Paper Pattern Review!


i've got a little something purdy to share with you all today from one of my wonderful sponsors.  i received an email a while back from the lovely and talented ladies over at violette field threads and i have to admit i got pretty excited when i heard their news.


i heart my sponsors and one of my favorite things about helping to promote women working in creative businesses is watching them succeed and their dreams come true.  so when they wrote to  me to tell me they were branching their pdf patterns out into paper patterns i thought wahoo!!!  they are gonna be gorgeous!  needless to say i was pretty excited to check them out and was definitely not disappointed!


the first three of their patterns to be released were molly, vivenne and stella.  three of my fave violette field patterns which was like icing on the cake!  i've previously made "the audrey dress " and i'm a big fan of their pdf patterns.


true to their timeless style and aesthetic the patterns came to me beautifully packaged and designed.  it was like getting a little magazine with a pattern it. the paper even feels like magazine quality. they have a nice, clean design and there are tons of bright, clear photographs to go along with the patterns.  the inside of the booklet is wonderfully laid out and flows naturally to the reader.


the booklet is accompanied by the the pattern pieces.  both are easy to follow and the cutting charts, instructions and layout are user friendly and suitable for any level of sewer.  i think they did a wonderful job!  even the paper pattern itself was pretty :) 


i found that they even covered the little details that make pattern reading that much simpler.  i especially liked that they have helpful hints and how to's at the beginning of each booklet as well as throughout the instructions themselves - they are very thorough and i really enjoyed flipping through the booklet.  i also appreciated the booklet style of the pattern instructions.  i find it makes it so much easier when reading along at the machine to have a booklet style because i have to admit i do get quite lazy when printing out pdf patterns and tend to just refer to my computer which takes me so much extra time so this was a refreshing change for me.  the booklet opens easily and lays nice and flat - no page flipping on it's own which is a pet peeve of mine.


violette field threads patterns cover such a wide array of sizes as well which is one of my favorite features about them as a pattern company. most of their patterns cover from 2 years to 10 years old!! some even go as low as 12 mths! wowsa!   i love the fact that i can make the same item for both of my girls with many more years of sizing to come.  i think that is a great benefit of their patterns and one that makes buying an actual paper pattern so worth the money.  the quality and design speaks for itself.  it makes me super excited to get on my sewing machine just looking at them.  you can really tell how much love and thought went into each design.  great job ladies!


so pop on over to violette field threads and see what's new!  i'm positive you won't be disappointed. 


a big thank you to the violette field threads for the lovely patterns & your support and also a giant sized congrats your way - i wish you so much success with your new venture!!! i know you will do amazing!!!  big hugs your way!!!


you can find all things violette field threads here on their website and also on their facebook page.

are you a fan of paper patterns?  are you smitten with violette field threads too?  what's your favorite thing about paper patterns vs pdf patterns?  let's chat sewing ladies!  i'm getting my machine all warmed up :P

winners of the rosy posy designs giveaway!


i hope you are all having a wonderful and lovely long weekend!  i'm just popping in today to announce the winners of the "rosy posy designs - be mine collection" giveaway!

The 3 winners are.......

laura, doreen and evelyn (from project: stash)

congratulations ladies!!!!  we'll be emailing you with your prize today!!!  happy shawl knitting...the patterns in the "be mine collection" are all stunning.


thank you again to rose beck for the lovely prizes and inspiring designs.

you can find all things rosy posy designs here:


i'm hoping to be back tomorrow but we think our youngest seems to have the croup now and with 2 sick kids and a hubs who is in the middle of a very busy tax season it may not happen so bear with me. i'll hopefully be here on wed for the start of our knit along :)  how was your weekend?  any crafting projects to share?